Scrap wood city recently reached 1K subscribers on Youtube. I want to thank each and every one of them. The subscriber support is awesome and keeps scrap wood city going on with enthusiasm!
First of all I mounted my router on my vise upside down. This way I can use the router as a router table. I clamped a scrap wood piece on it’s base to act as a fence. I pressed the starting buttons with clamps. This technique is not too safe, so do not try it unless you feel comfortable to do so.
Then I passed through the spruce piece of the frame and created a rabbet for the glass and the picture to sit on.
Then I cut the frame pieces to size in my miter box with my saw.
I glued the frame using a frame clamp. I also added weights to keep everything straight.
To add extra strength to the frame, I added dowels on the corners 45 degrees against the grain. I trimmed them flush with my flush trim saw.
I used my block plane to round over the edges of the frame.
I sanded the piece with 120 grit sandpaper.
I applied a coat of clear satin, water based varnish. After the first coat dried out. I sanded the piece lightly with 600 grit sand paper, and applied another coat of varnish.
I went to a glass store and bought a piece of glass in the dimensions of my frame.
I used it as a guide to measure the back of my frame on a piece of plywood.
I cut the back on my scroll saw.
I straightened the back with my block plane.
I also cut the other piece of the back on my scroll saw.
I glued the back pieces together. To hold them in place during glue up, I stapled them and nailed them together.
I used my belt sander to shape the pieces that hold the frame and the back together.
I predrilled some pilot holes and assembled the pieces on the frame.
Using pedals with your guitars is awesome, but having them neatly mounted on a board with their power supply can be a problem. So I made my own pedalboard out of a piece of plywood.
First of all I layer out all my pedals on the board to measure the size I needed.
Then I cut the board to size with my circular saw and my cross cutting jig.
Then I cut the feet of my board with the circular saw. I cut them freehand, taped them together with two sided tape and flush sand them on my belt sander.
I added rounded corners to my board. To draw the the radius I used a spray can. I cut out the corners with my jigsaw.
I sanded the corners with my sanding block.
I designed the handle out of a scrap plywood piece and cut it out with the jigsaw. I sanded it. For the inner rounded corners I used a dowel as sanding block.
I decided to join the handle and the board using dovetails. I first drew the male tails on the handle and cut them out on my scroll saw.
Then I used the males as guides to to trace the female tails on the board and cut them out with the jigsaw. I filled and sanded the female parts to fit the handle snuggly. I glued it with wood glue. To fill the gaps I added glue to the joints and then sanded over them. This way the gaps were filled with wood dust and glue.
I glued and screwed the feet to the board. I first drilled pilot holes for the screws with my rotary tool. I also added a clamp to secure things in place before adding the screws.
I mounted the power supply by making a few blocks. I also added a hanger screw type thing to secure the unit from underneath.
I masked the areas I wanted to add velcro and then painted the whole thing with a black spray can. I added several light coats of paint.
I added the one side of the velcro on the pedals and the power supply and I glued the other part on the board.
I assembled everything together and I was ready to roll!
First of all, I want to thank Opus Decor for producing the vinyl stencils.
I branded my router, my jig saw, my hand saws, my circular saw, me belt sander and my vice using this method.
First I peeled off the back side of the stencil and placed it on the tool. Then I peeled off the front side of the sticker and masked the rest of the area with paper tape.
I sprayed the color I wanted and let it dry. Then I carefully removed the rest of the vinyl with my utility knife.
My stencil isready, and my logo is now placed on my most important tools!
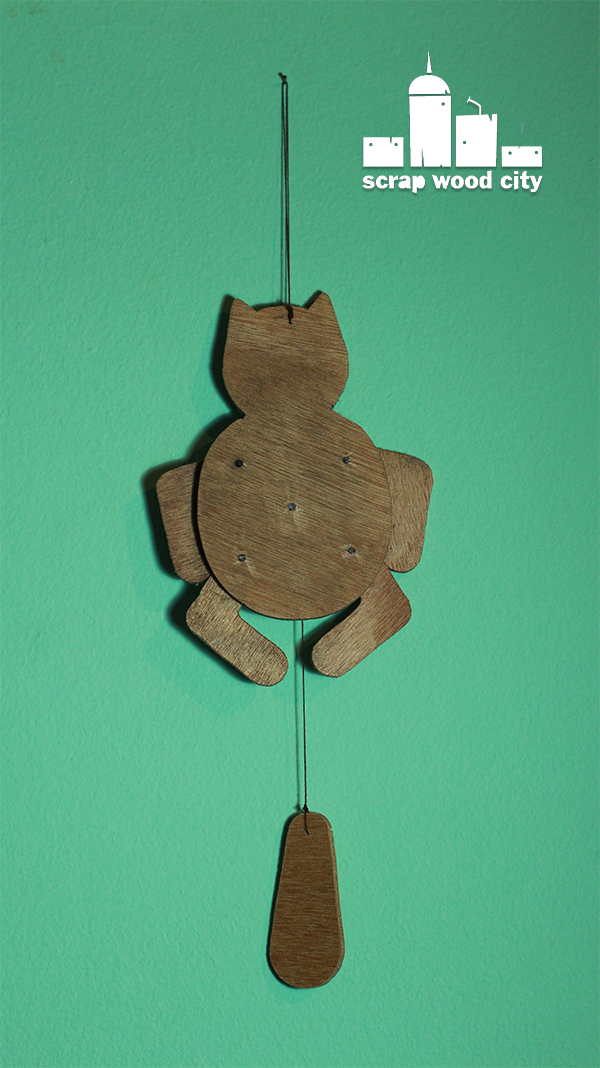
First of all I drew a rough sketch of my cat on a piece of paper.
Then I scanned it and imported it in Adobe illustrator. I converted it to a vector graphic.
I printed all the parts and glued them on a piece of plywood using spray glue.
I cut out the pieces on the scroll saw.
I sprayed the glued paper pieces with rust remover, let it soak for a few minutes and the easily pealed off the templates.
I drilled the holes I needed on the drill press. Because the plywood I had was really thin, I used a clamp to hold the pieces in 90 degrees for the vertical drillings.
I sanded all the pieces.
I Joined the arms and legs with screws. I trimmed the screws flush using my rotary tool.
I joined all the pieces with string. Because making knots with such a thin string is impossible, I used my glue gun to secure everything in place.
I also added a ring in the middle for the string to be guided through.
My cat is ready.
It would be easier if you used a thicker piece of plywood. The holes would be made easier and you could use a thicker string.
But that’s what I had laying around I hope you like it.