Wednesday, October 30, 2019

How to make a pair of DIY dip bars out of reclaimed wood


I really want to thank SKIL for sending me many power tools which I use every day:

Tools and materials I propose:

Making your own training equipment is really fun. I made two dip bars out of reclaimed pine and a 40mm spruce dowel.

I begun by glueing three boards together for each leg. I used another board as a spacer. I used nails to secure the pieces in place while the glue dried out. 

I then cut all the pieces to length on the table saw. A circular saw and a speed square works just as well.

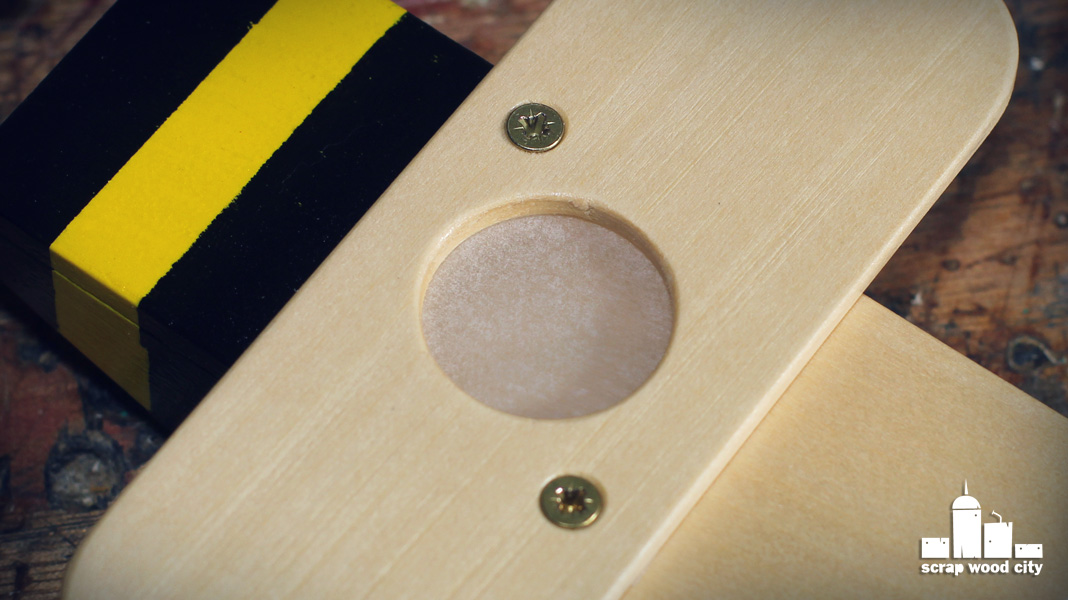
I then made a quick jig so I can easily mark the dowel’s position on each leg. This also helped me to avoid measuring. I then used a 38mm spade bit to drill the hole for the dowel. To avoid tear out I drilled the hole from both ends. 

I then rounded over the bases of the legs on my belt sander. You can also use a saw and a sanding block. 

My dowel was 40mm and my largest spade bit was 38mm. So I came up with a smart set up, so I can reduce the size of the dowel’s ends on the table saw. You can also go old school and use a saw, a chisel and a file to do that job. 

At this point I sanded all the parts. I also broke the edges with my block plane. 

I added screws on the legs for extra strength. I first predrilled pilot holes and I counter sinked them.

I then glued and screwed the bases in place. 

To make sure that the legs are perpendicular to the dowel I made a spacer to help me glue the dowel straight. 

I then glued and screwed two braces close to the bases, to keep everything nice and strong. 

Finally I cut the dowels flush with a saw. I used a piece of masking tape to prevent the saw blade from damaging the wood.

My dip bars came out great. Now it’s time to do some chest exercises. But I hope you liked this one, because that was it. See you soon with a new project video.


Disclosure: Some of the links below are affiliate links, meaning, that at no cost to you, I get a small commission if you click through and make a purchase.

Wednesday, October 23, 2019

How to make the bee kazoo - DIY


Tools and materials I propose:

I wanted to make a wooden kazoo. A flying bee kind of sounds like one. So why not make a bee shaped kazoo!

I begun my cutting a piece of basswood to size on the table saw. But before I did that, I installed the zero clearance insert. I was about to cut small pieces and I didn’t want anything jamming my saw’s blade.

I then lowered my blade and cut a shallow groove with multiple passes on the table saw.

Then I used a forstner bit to open up the hole for the membrane. I drilled both the cap and the wings at the same time. 

Using a washer I designed the round overs of my wings. I then used the belt sander to shape them.

Then I glued the cap on the body. Once the glue dried I sanded everything flush on the sander. 

On the bandsaw I cut the body shape. I finished shaping on the belt sander. 

I sanded everything with 100, 220 and 320 grit sandpaper. 

With my rotary tool I predrilled pilot holes. And with a counter sink bit I countersunked the holes of the wings. 

Then I used masking tape before I started painting with latex paint. To make small stripes for masking, I placed the tape on a piece of plexiglass and then cut the stripes with an exact knife.

I finished the piece with several coats of spray varnish. I lightly sanded between coats with 220grit. 

As a membrane I used baking paper. You can experiment with different papers or plastic. The membrane is secured in place with the screws of the wings.

In order for the kazoo to work you have to hum a melody in the mouth piece. The humming vibrates the membrane and produces a tone.

I am really happy with my bee kazoo, but that was it, see you soon with a new project video.


Disclosure: Some of the links below are affiliate links, meaning, that at no cost to you, I get a small commission if you click through and make a purchase.

Wednesday, October 16, 2019

How to make a kalimba out of epoxy resin and wood


On this project I used Inventables X-carve CNC machine:

Tools and materials I propose:


In this video I make a thumb piano out of epoxy resin and pine wood. The metal tines were made out of an old hacksaw blade.

First of all I cut some wooden blocks on the table saw. I secured them in place with tape in a plastic bowl. I then cut a round piece on the bandsaw to help me mount the blank on the lathe. I then mixed some resin with black dye. I degassed the resin in the vacuum chamber and then poured it into the mold. I degassed it again and let it cure for a few days.

Then I secured the blank on a face plate and started turning it true on the lathe, with a round scraper. 

I reversed the blank by glueing it on a wooden block with 5 minute epoxy. I then hollowed the bowl with the bowl gouge. 

The bowl was not deep enough, so I decided to add a segmented ring. I turned my table saw’s blade at 22,5 degrees and cut my segments. I glued the two halfs first. Then I flattened their edges and glued the whole ring. 

I then sanded the ring flat and glued it on the bowl with 5 minute epoxy. I turned the bowl true and sanded it. 

Then I glued two pieces to make the top of my instrument. I glued the piece on a melamine with hot glue. Then with the thickness planer I planed the top at 4mm thickness.

I then inserted my vector SVG files into easel and carved my instrument’s top, with my x-carve cnc machine. 

Using a heat gun and a spatula I released the top from the board. I glued a support piece under the top and then glued the top on the bowl. I turned the top flush. 

I then parted the piece off the lathe. I reversed chucked it on my bowl bottom cleaning jaws. I then finished the shaping. I sanded the bowl until 1000grit. I then moved on to my micro mesh pads and finally I polished it on my buffing wheel system.

I then cut two small support pieces. On one of them I cut a groove with a V chisel and a round file and glued a nail into the groove, with 5 minute epoxy. 

Then I made a metal support out of brass. I shaped it with files and sandpaper. I then glued the supports in place. 

I made the tongues out of an old hacksaw blade. I cut them to size with my angle grinder. 

I then heated the ends with a blow torch and then hammered them against a hammer to create a round over. I finished shaping them on the grinder. 

I then placed the tongues in their place and tuned my kalimba in a pentatonic scale I liked. 

I really want to thank Inventables for sponsoring this project. My Kalimba came out great. 

But that was it, see you soon with a new project video.


Disclosure: Some of the links below are affiliate links, meaning, that at no cost to you, I get a small commission if you click through and make a purchase.

Thursday, October 10, 2019

How to make a kuksa mug


Tools and materials I propose:

This project is inspired by the traditional Finnish kuksa mug. Traditionally, a guksi is made out of birch burl. But I made mine out of basswood. 

I begun by using a square piece of basswood. I used a hand plane to make the top and bottom flat. 

I then designed my kuksa on the wood. It is important to keep the centres of each side visible while you carve the shape. 

Next i cut the shape on the bandsaw. The side was two thick for my bandsaw so I used a handsaw. 

With the basic shape done I started hollowing the kuksa with a spoon carving knife. 

Using the spokeshave I started shaping the exterior. I was careful to follow the grain. On the endgrain I used the tool at an angle. I used a carving knife to reach into a few tight spots. 

I then started hollowing again. I kept moving back and forth between the spokeshave and the hook knife, until I felt in my hand that the walls of the mug were even. 

I used a forester bit to drill the hole for the leather hanger. 

Once I was happy with the shape, I used a flat and a round file to even all the exterior surfaces. 

To sand the interior I made a custom spherical sanding bit on the lathe. You can make similar bits for your drill. Make sure that the foldings of your sand paper follow the direction of your drill’s spinning.  

After roughly sanding the interior, I sanded everything with 100, 220 and 320grit sandpaper. I finished the kuksa with food safe mineral oil. 

I cut a piece of leather as a hanger and my kuksa or guksi was ready.

I think it is perfect for a cup of mountain tea. But that was it, see you soon with a new project video!


Disclosure: Some of the links below are affiliate links, meaning, that at no cost to you, I get a small commission if you click through and make a purchase.

Thursday, October 3, 2019

How to make a handmade wooden spoon


Tools and materials I propose:

Making spoons with hand tools is really relaxing and satisfying. I made my spoon using a few carving knives and a spokeshave. The wood I used is basswood. 

I begun by squaring a piece of basswood on my plane/jointer machine. I then cut my blank to size on the tablesaw. You can skip this step and just get a ready made flat board.

I then designed my spoon’s shape on my blank. I carefully marked the centres of each side. I also tried to keep them visible throughout the process. 

I cut the first side on the bandsaw. I then temporarily hot glued the offcuts back in their place. Then I cut the other side of the design. 

Using a spokeshave I did some shaping on the back of the spoon and also on the handle. 

Using my hook knife I started hollowing the spoon. I then used the large knife to do some shaping. I also used a small detail knife to get into some tight spots. Throughout the whole process I was paying attention to the grain of the wood. It is important not to force the fibers of the wood. The knives must be stropped razor sharp and you should be able to create nice shavings easily. 

I then sanded the spoon smooth with 100grit. I moved on to 220 and 320. At 400 I wet sanded with mineral oil. Finally I used some abrasive paste to polish it.

I am really happy with the way it came it out. The whole process was so fun to do.

But that was it, see you soon with a new project video.


Disclosure: Some of the links below are affiliate links, meaning, that at no cost to you, I get a small commission if you click through and make a purchase.