Tuesday, October 24, 2017

How to make a custom wooden keychain on the CNC machine


Recently Inventables sent to me a box with some interesting materials. They also sent to me a set of V carving bits and gave me access to Easel Pro software. 

So I decided to do a project that wood include V carving. My logo is fairly complicated and I thought it would be perfect to test how detailed work I can achieve.

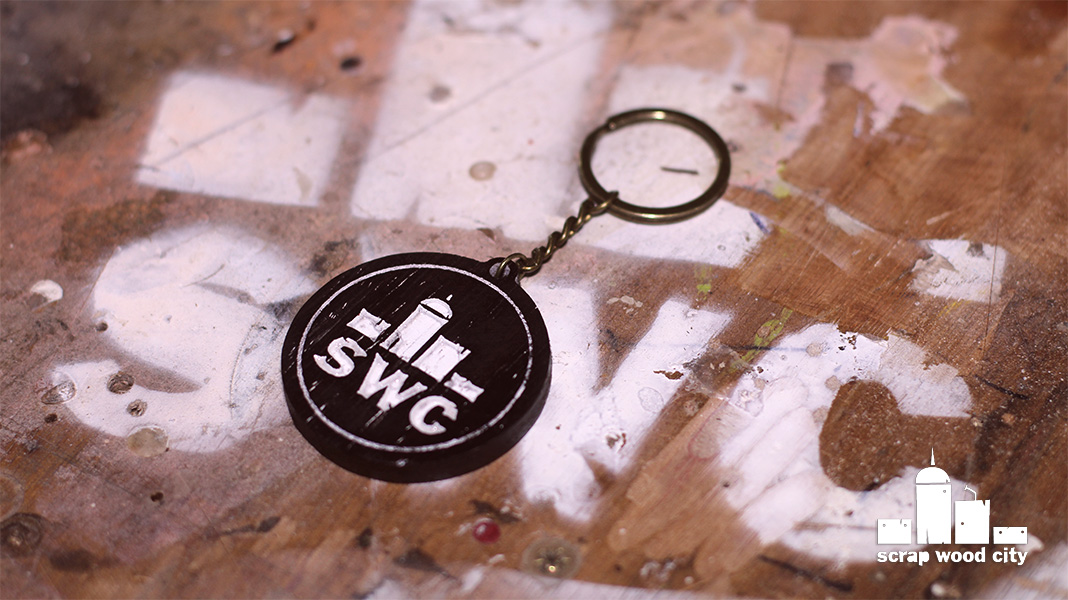
My keychain is made out of wenge wood. I Cut two pieces of it on the bandsaw. I glued the two pieces together with their grain perpendicular to each other. This way I created a kind of plywood which is much stronger and perfect for the work I wanted it for. 

I then secured the material on the x-carve cnc with double sided tape. I did that in order to avoid using tabs on my carving.

I then designed my keychain in illustrator. I exported the design as an SVG file which I then imported in Easel pro. 

The carving would be completed in three stages. First a detailed pass with the v carving bit. Then a roughing pass with a straight bit. And then another roughing pass with a straight bit to cut out the material. V carving and carving in detail and roughing passes are features available only in Easel Pro. Easel Pro also has a detailed preview and a carving simulation. This way you know the course the router while take while carving.

Because I completed the carving in three stages I always made a copy of the original easel file. So I worked every stage in a different copy of the original file.

After the carving procedure was done. I sanded the piece with 240 sandpaper to remove any burrs. I then sprayed a coat of white paint on the carving side. When the paint dried out, I sanded again with 240 and this way the design remained white in contrast to the really dark wenge surface. I also did not sand the paint all the way. This way my keychain had a kind of rustic look which I think fits better the whole scrap wood city concept of my channel.

I finished the piece with mineral oil and added the chain.

I am really happy with the way it came out, especially it’s texture!

Many thanks to Inventables for the really cool stuff they sent to me!


If you want to make this project yourself, you can find the easel file here.


Thursday, October 19, 2017

How to make a wooden rubber band toy rifle


I made this wooden DIY toy gun from a piece of maple. 

First of all I jointed one side of the maple board on my jointer. After I had established one flat side I reduced my material’s thickness on the thickness planer.

This toy is based on a template I designed. I glued the template on the wood using spray adhesive.

I then cut out the basic form of my rifle on the bandsaw.

I flattened the top using a planer. 

I used flat and cylindrical files and rasps to clean the piece form the saw marks.

Using my heat gun, I gently removed the template from the wood. 

I then switched to the spokeshave to round over as many edges as I could. When using the spokeshave it is important to always go with the direction of the grain. If your cuts are not clean just change the direction you use the tool.

In the areas the spokeshave could not reach, I used my old trusty files and rasps. 

I then sanded my piece starting with 100grit. I then moved to 240 and stopped at 320.

The trigger of my gun is just a wood clothes pin. To customize it a bit to fit my overall design I cut a small piece on my bandsaw. 

I glued the little piece on the clothes pin and then glued the whole trigger on the rifle. 

I finished the project with mineral oil.

At this project my little toy rifle was ready to shoot some rubber bands! :)

Wednesday, October 11, 2017

How to make the crocodile, a percussion musical instrument


I made this DIY instrument out of a piece of maple. It can also serve as a fun wooden toy or decorative element. I made it using mostly hand tools. I also used the lathe to turn the scrubbing stick.

In order to produce the sound, you just scrub the stick on the crocodile’s back in a rhythmical way.

First of all I rough sketched the basic shape of my crocodile. I then scanned it and designed the vector template over the sketch. 

I took a piece of hard maple and jointed one edge on the jointer. With one side flat I fed the piece on the thickness planer to flat the other side also.

I then glued the template on the wood using spray adhesive.

I used the drill to open up a hole for the jigsaw blade. I then Used the jigsaw to cut the handle shape out. 

I used the drill to remove material from the crocodile’s back. I then cut the rest of shape out on the bandsaw.

I finished the rough shaping with round and flat rasps and files. I then sanded the piece with 100 grit sandpaper.

I used a dowel and a flat wood piece as sanding blocks to sand all the different areas.

Using a heat gun I gently removed the template from the wood.

I finished sanding with 240 grit sand paper.

On the jointer again I flattened the side of another piece of maple.

I rip cut it on the table saw. I cross cut the edges with my cross cut sled.

I then glued the two pieces together.

Using again the table saw with the blade at 45 degrees, I removed as much material as I could to save me some time on the lathe.

I then mounted the stock on the lathe between centers and used the roughing gouge to round the stock over. I finished shaping with the skew chisel. When the piece became to thin I used my hand as support to avoid vibrations.

I finished the piece with a coat of mineral oil.


My little crocodile percussion toy was now ready, I am really happy with the way it came out!

Wednesday, October 4, 2017

How to make a DIY electric broomstick guitar


This is a really minimalistic one string instrument. It is made of a broomstick and a lipstick telecaster guitar pickup. This guitar is played with a bottleneck slide. It is inspired from the early blues roots days.

First of all I sanded the finish off the broomstick.

Using a handsaw and a miter box, I cut the stick to size.

I then shaped the neck. I first used a handsaw to make relief cuts. I then used a chisel to remove as much material as possible. I then used a rasp, a file and sandpaper to finish the shaping.

I drilled a hole for the tuning peg.

I used a piece of string with a dowel to find the center points of the stick.

I added rivet heads to hold the string in place. I secured them in place with super glue.

I then created a notch that would receive the lipstick pickup.

Using my angle grinder I cut a scrap piece of metal that would receive the output jack. On my drill press I drilled holes on it. To avoid the burning of the drill bit I used oil to cool it down.

I then added the tuning peg. Whenever I wanted to add screws I always predrilled pilot holes to avoid splitting of the wood.

I measured the scale of my instrument from nut to bridge. For nut and bridge, I actually used two ball headed screws. I then went to an online fret calculator to find out the fret positions. I marked the fret positions with an owl and then drilled holes to act as fret markers. I spray painted the holes and then sanded over them to keep the color only inside the holes.

The electronics of this guitar are pretty simple. I just soldered the two ends of the pickup on an output jack. I secured the excess wires with a zip tie. I also used heat shrinking tube to cover up a couple of soldered wires.

I assembled the instrument and added the string.

At this point my instrument was ready. All I needed was to add a bottleneck slide on my finger and plug the guitar in my amp! 

After that I am ready for some blues!