Thursday, December 24, 2015

How to make a saw, using a broken bandsaw blade


For this project I used a few scrap spruce pieces I had on the shop. 

Using my miter box I cut two pieces around the same size. 

I glued those pieces temporarily, using double sided tape.

Using a ruler and a compass, I designed the arms of my saw. You can cut those with a fret saw but I cut them on my bandsaw.

Using a hand plane and sand paper I cleared the saw marks. I also drilled a few holes on my drill press.

I followed similar procedures to make the main cleat that unites the two arms.

All the saw pieces are joined with screws, washers and butterfly nuts. 

I then trimmed a broken bandsaw blade to size using my wire cutter. I heated up the blade to reduce it’s hardness and drilled holes on it’s sides, using my drill press.

I used my bandsaw to make the slots for the blade to sit in.  I also used my bandsaw to make a little stop block so that one arm won’t move. I attached that block, using screws. I also made pilot holes to prevent the wood from splitting.

I added the blade using screws as shafts.

For the blade’s tightening mechanism, I added a paracord kind of string which through rotation tightens the blade. This is the same technique we find on bucksaws and frame saws. 

I also used a scrap wood piece to act as the string’s stopper. 


Once my blade is tight I can start sawing!

Thursday, December 17, 2015

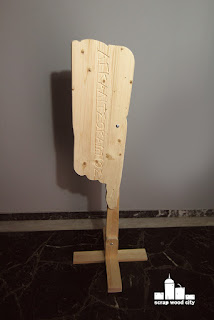
Wooden folding floor sign for a magical place


Recently Katerina Kris asked me to make a sign for “astriko xorio” a magical place from her new children’s (big and small) book.

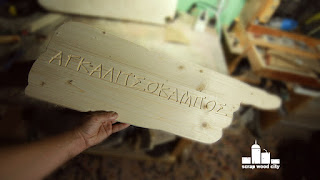
The sign had to look like a sign illustrated in the book, which looks like a wooden hand that points to “agkalitsokampos” a place in the book’s story. 

It had to be portable and it had to be able to separate in parts.


I made this sign out of spruce. The main sign was cut on my CNC machine.


The sign folds with bolts and butterfly nuts. It also connects with the base in a similar way.


I gave the whole piece a round over using my router and a round over bit.


Don’t forget to check on Katerina’s work and the awesome “astriko horio”.

Wednesday, December 16, 2015

How to make a plywood piggy bank


I designed this piggy bank and used several layers of 8mm birch plywood to make it.

First of all I glued four pieces of plywood together. I then glued the inner template of my design on the pieces, using spray adhesive.

I cut the inner piece on my bandsaw. To remove the template I used WD40 rust remover.

In order for the bandsaw to cut the inner shape, I had to make a cut on the external side of it. When I finished cutting, I glued that cut, using glue and a clamp.

After that, I glued two 8mm plywood pieces together, using double sided tape. I glued the front and back template and cut the front and the back at the same time on the bandsaw. I also cut the ears and the nose of my piggy.

I glued the front piece first. 

The back piece is screwed in place, so I can remove it to open the piggy bank when necessary. To do that I pre drilled a few holes with my drill and counter sinked them on my drill press.

To make the slot, I drilled a few holes and then cleaned them up with a chisel and sandpaper.

I sanded my pieces, using several scrap wood pieces as sanding blocks, in order to sand all the different areas of the piggy.

On my drill press I made a few holes to act as eyes and nose holes.

I glued the nose and the ears in place.

I did a final sanding.

I finished the piece with two coats of latex paint, while sanding with 240 grit sand paper, between coats.

My piggy was ready.


You can download a free vector template of my piggy bank, here.

Thursday, December 10, 2015

Thursday, December 3, 2015

How to make a wooden crossbow


I made my crossbow out of 8mm birch plywood.

First of all I designed my crossbow templates in illustrator. I then printed out the templates and joined the A4 pages using tape.

The build begun with the body of the bow. I cut two pieces of plywood with my circular saw. I glued the two pieces together using double sided tape. I glued the template using spray adhesive and cut out the body using my jigsaw. 

I sanded the body with a sanding block. For the curves I used my metal ruler as a sanding block in order to follow the curves of my design, while sanding. 

I sprayed the template with rust remover and took it easily off the wood.

I used my fret saw to cut the smaller pieces of my template.

For extra strength, I glued a few blocks of wood between the two sides of my bow’s body.

I sanded the remaining parts using my belt sander and my metal ruler as a sanding block.

For the trigger mechanism I fist added the trigger. I first drilled a hole on my drill press.

I used my dremel tool and metal cutting disc to grind off a piece, from a few screwable metal rings.

I connected the trigger with string holder using my metal rings and a folded rubber band. I also nailed and glued a stop block. I added the string holder raiser and added a screw to act as stopper.

I preassembled the body and added screws to keep everything in place. 

Using my rotary tool again with a metal cutting disc, I trimmed my screws flush with the bow’s body.

I screwed another stop block for the string holder on top.

I screwed the bow in place. I added screws to hold the string. I also added two guides for the arrow. I nailed and glued them in place.

The string of the bow is just a few rubber bands connected with each other.

On my table saw, I made a simple arrow. I Created a v at the end of it using a chisel. I did that to give the string a place to push the arrow forward.

My bow is ready. 

Please be extremely careful if you try this build. If you do so, do it at your own risk and never point the bow to people or animals!