Friday, October 28, 2016

How to make a DIY designer’s desk


I wanted a large double desk for two people. I made it out of a spruce panel, three saw horses and spruce boards. I wanted everything to be removable, so I joined it all using screws and metal corners.

It’s design is industrial looking and I like the fact that it kind of reminds me construction site because of the saw horses. 

I begun by making the main frame. I used my circular saw and a guide rail to cut the 45 degree miters.

I then used my table saw, to rip cut the cleats. I did a bit of cleaning with my block plane. 

I predrilled pilot holes and screwed the side cleats to the sides of the frame. 

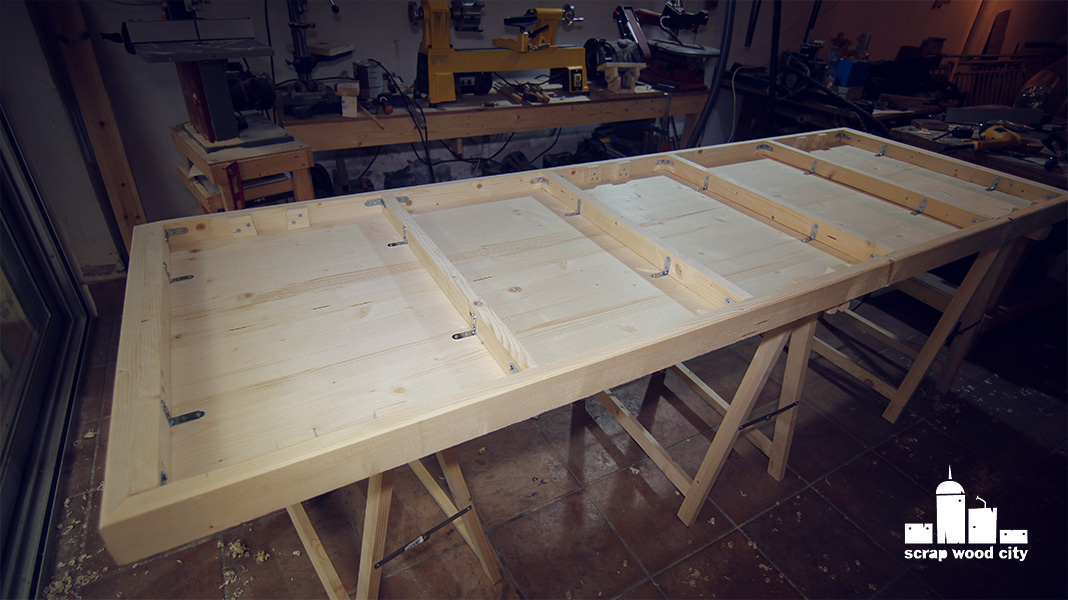
To hold the frame together before screwing it together, I used corner clamps. I joined the pieces of the frame using screws and metal corners.

I cross cut the cleats to size, using my cross cut sled on the table saw.

To clamp the sides so I can add the cleats, I used a piece of string and tightened it just like bow saws do. I then installed the cleats with screws and metal corners again.

Using my circular saw and a guide rail again, I cross cut the desk top panel to length. I used again the circular saw, only this time I freehanded the rip cut to rough size. I then used my block plane to trim the sides so that it fitted just right in the frame.

I then secured the panel to the frame using screws and metal corners, once again.

I marked the dimensions of the saw horses and trimmed them to size using the bandsaw.

I then made a few stop blocks on the bandsaw so that the saw horses stay in place. I made the miters  on the blocks using a spirit level so that the saw horse kind of sits straight. I screwed the blocks in place.

I then used the block plane to clean up, to round over the edges and to plane the sides flush to the desk’s top. 

I sanded everything. I also filled a few gaps using glue and sanding dust.

I cleaned all the dust with my vacuum and applied six coats of clear, satin, water based varnish on the desktop. I sanded between coats with 240 grit sand paper.


My desk was now ready. I hope you liked it.

Wednesday, October 19, 2016

How to make a DIY spoon carving gouge


This spoon shaped chisel is designed to reach deep and difficult areas in a wood carving situation.

I made it from an old file ( because files are made of really hard tool steel ) and a piece of maple.

First of all, I used my angle grinder to cut the file to the basic shape I needed.

I then used the belt sanders and the bench top grinder to shape my file even more and clean up the file lines.

This gouge has two curves. To make them, I heated the steel and bended it against a metal cylinder and a sledge hammer that were both mounted on my bench. I heated it using my propane torch.

The tip of the carving gouge must a have a curve. I heated the tip to red hot, and then hammered it against the ball of a ball headed hammer. With my basic curve forged, I moved to the belt sander to grind my basic bevel.

I then heated my tool to red hot and dipped it in oil to harden it.

To give the blade a bit more flexibility ( to avoid snapping ), I heat treated it in the oven at 180 degrees Celsius for about 2 hours.

I then cleaned the steel with 100 grit sand paper and WD40. To remove any burrs, I rounded a piece of wood with my block plane and sand paper. I mounted a piece of sandpaper and the wood on a vise and used it as a curved sanding block.

I cut a piece of maple on my bandsaw, to make the handle.

Using my chisels I opened up a groove to receive the tool. I then glued the two pieces together. 

I clued a piece of plywood on the end of my handle ( the one with the open hole ).

I mounted the handle on my lathe and used the scraper tool to round it over. I used the skew chisel to make the handle’s back. 

Using my rotary tool I cut a piece of metal tube. I measured the diameter with a caliper. I turned the edge of my handle to match that diameter. I used a parting tool, the skew chisel and a spindle gouge to do that.

I then finished the shape with the spindle gouge, sanded the piece and applied a couple of coats of beeswax and olive oil finish.

I cut the excess pieces on the bandsaw. I also shaded the metal ring flush with the handle, using my homemade disc sander for the lathe.

I glued al the pieces together with two part epoxy glue.

At this point, I decided to change the grind of the tool before sharpening it, so I moved to the belt sander again. Only this time I had to dip the tool in water from time to time, to prevent the tip from burning and losing it’s hardness.

I sharpened the tool on my two grit oil stone. When I reached to a burr I removed it with a cylindrical stone.

I then stropped the tool on a piece of leather, on which I had applied polishing compound. I removed the burr again by rubbing the tip against the sanding block I made earlier. Only this time, it had leather instead of sand paper.

At this point, my tool was ready and razor sharp. I hope you liked it!


Thursday, October 13, 2016

How to make a DIY draw knife from an old file


Those vintage woodworking tools are rare and expensive. So I decided to make one from an old file. Files are a good choice because they are made of really hard tool steel.

First of all I used a chalk to mark the areas I wanted to cut out. Then I used my angle grinder to remove the unwanted material.

I then moved to my bench top belt sander to clean the file marks from my tool. I also used my rotary tool with a cylindrical stone bit to clean the inner curves of my shape.

I then moved to my grinder to establish the bevel of my knife. I used a home made tilted base to help me grind the bevel as straight as I could.

I wanted the handles of my tool to be at a slight angle. To bent them I used a propane torch to heat them up to red hot. Then I clamped them against a metal cylinder and hammered them in place. I also used an old sledge hammer as an anvil.

I drilled holes for brass pins on my drill press. Before that I burned the tool with the torch in order for the steel to become soft. Before that the drill could not penetrate the hardened steel of the file.

Then I heated the tool to red hot with the torch and dipped it in oil to harden. I then put it in an oven at 180 degrees Celsius  for 2 hours. This heat treatment gave the tool some flexibility to prevent it from snapping.

I cleaned the tool with WD40 and 100 grit sand paper.

On a piece of paper, I drew the handle shape and transferred it on a piece of hardwood, I think it is iroko. I then cut the handles on the bandsaw.

I cleaned the bandsaw marks on the home made disc sander I made for the lathe.

I used my chisels to carve out the grooves for the tool’s handles.

I used my drill press to drill holes for brass pins. I cut the pins to size and glued everything with two part epoxy glue.

I then cut off the excess brass on the bandsaw and used my belt sander to shape the handles. The belt sander was mounted on the bench with clamps. I finished sanding by hand.

I finished the handles with a couple of coats of teak oil.

I then sharpened the blade with various grits of sand papers, a flat sanding block and WD40. 

I then finished the blade with a piece of leather with polishing compound.


My draw knife was ready and razor sharp, I hope you like it!

Wednesday, October 5, 2016

How to make a simple DIY tool board for the shop's wall


I wanted to make a new tool board for my shop’s wall.

I made it using an OSB panel, screws, nails, hangers and a few scrap plywood pieces.

The board would be mounted on the wall with upat. First I drilled the holes on the OSB.

Then I used a 2x4 and a spirit level, to hold the board straight. I then used a marker to mark the positions of the holes to the wall.

I then drilled the holes and used a mallet to drive the upats in. After that I screwed the board on the wall.

Basically I used three methods to hang the tools on this board. 

The first was to use metal hangers. I predrilled and mounted them on the board. I positioned them depending on the tool arrangement I wanted. I also used screws and nails to kind of hold the tools in the positions I wanted. 

I also used a marker to trace around each tool, so I know it’s exact position on the board.

The second mounted method is used basically for my chisels, screw drivers and even drill bits.

I cut a scrap piece of plywood on the bandsaw. Used a compass to mark the hole positions. And then using a step drill bit I opened conical holes. I then cut an entry slot on the bandsaw.

I predrilled screw holes on the drill press. I used a mallet to tap the chisel holder on the board. I predrilled and screwed the holders in place using my spirit level again, to make sure everything was straight.

The third and final mounting method is using wooden dowels. I used that to mount my pliers. I just positioned the tool, used an owl to mark the place for dowels, drilled holes and placed the dowels with wood glue.

This is basically it. I tried to position the tools on the board by categorizing them. So I have my saws all together, my pliers, my chisels, my measuring tools e.t.c


I hope you liked it.