Friday, November 26, 2021

Making a wooden bowl without a lathe - Woodcarving


Tools and materials:

Carving tools set

Carving mallet

Cabinet Scraper set

Cordless chainsaw

Skil electric planer

Spoke shave

Flat rasp

Flat file

Random orbit sander

Mineral oil


In this video I make a wooden bowl out of a piece of pine I had in the shop. Despite the fact that it was pine, it was pretty hard to carve. 


First of all I used a compass to establish the main diameter of my bowl. Then I drilled my depth hole in the centre. 


Using a big gouge I started hollowing the bowl. Once in a while I added lines to carve the bowl in segments. This way I had a little better control over the shape I was going for. 


I used a round scraper to clean the tool marks although later on I decided to add more character in the interior with a gouge. 


I used my chain saw to remove as much material as I could from the exterior of the bowl. 


Next I used an electric planer to shape the exterior as much as possible. 


To clean the lip of the bowl I used a spoke shave. 


I finished shaping with a rasp, a file and my random orbit sander. 


I decided to add some character in the interior by leaving the gouge marks.


Finally I finished the bowl with mineral oil. 


My bowl came out really unique. But that was it, see you soon with a new project video. 


Disclosure: Some of the links below are affiliate links, meaning, that at no cost to you, I get a small commission if you click through and make a purchase.

Friday, November 19, 2021

How to make a simple DIY table out of old wooden floor boards


Tools and materials:

Jointer planer

Circular saw

Circular saw guide rail

Speed square

Miter box

Hand saw

Belt sander

Countersink bits

Chisel set

Bandsaw

Table saw

Block plane

Cordless Impact Driver

Cordless drill

Random orbit sander

Air compressor, nail and staple gun kit


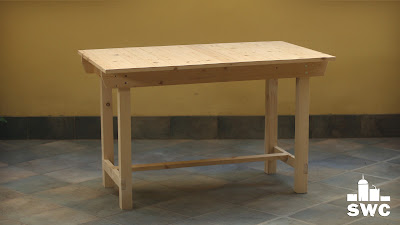
In this video I make a table out of a piece of an old wooden floor. The floor was made out of pine. I also used some spruce to make the legs. 


This was actually a piece of floor that was removed so we could install an interior ladder.


I begun by taking the pieces apart using a leaver. I then had to glue a few pieces which I broke during the process.


Next I planned and cleaned the back cleats. 


I re-glued the rabbeted pieces in sections. The last section was longer than any clamp I had so I glued some wooden blocks to clamp the pieces together. 


Next I cut the table top to it’s final size with my circular saw and a guide rail. 


I then glued and nailed two new cleats in place. 


I added trim to hide the end grain. I glued and nailed it in place and then I used a block plane to make it flush. 


Next I sanded the table top. I also rounded the edges with a block plane. 


Next I made the legs and the horizontal cleat. 


I then sanded everything and my table was ready. 


I am really happy with the result. I hope the grain will do well enough with expansion and contraction. But that was it. See you soon with a new project video.


Disclosure: Some of the links below are affiliate links, meaning, that at no cost to you, I get a small commission if you click through and make a purchase.

Friday, November 12, 2021

Woodturning a long shoe horn


Tools and materials I propose:

Lathe

Buffing kit

Wood turning tools set

Chuck kit

Tormek T8 Sharpening System

Tormek Woodturner’s Kit

Wire Burning Kit

Block plane

Spoon carving knives

Centre drill countersink bit


In this video I make really long shoe horn out of basswood. 


The inspiration for this project came from Mr Ernie Conover's video on turning long spindles with mortise & tenon joints: https://www.youtube.com/watch?v=MqTcYmoLtag


I begun by cutting my stock to square pieces on the table saw. 


I then started truing the pieces with a skew chisel. 


Obviously you can’t glue end grain and my lathe is too small to turn such a long piece. So I had to join the pieces with mortise and tenon joints. 


To make the mortises I attached the drill bit on the main spindle of the lathe. I used the tailstock to push the piece against the drill. This way I can achieve centred holes on both ends of the piece. 


To make the tenons I roughly turned them close to size and then I used sand paper to remove the rest of the material. This way I  achieved a pretty snug fit. 


I added beads on the places where two pieces join. This way I can hide the joint. 


Once I turned all the pieces, I glued them together. 


To make the horn I first turned the piece on the lathe. Then I removed most of the material on the bandsaw and used a spoon carving knife to finish the job. 


Once I glued everything together I buffed the piece on a buffing mop.


It came out really nice and works really well. But that was it. See you soon with a new project video. 


Disclosure: Some of the links below are affiliate links, meaning, that at no cost to you, I get a small commission if you click through and make a purchase.


Friday, November 5, 2021

How to make a simple mini DIY greenhouse for growing seeds in winter


Tools and materials:

Speed square

Miter box

Hand saw

Bandsaw

Table saw

Block plane:

Cordless drill

Random orbit sander

Hole saw

Air compressor, nail and staple gun kit


In this video I make a small simple greenhouse for growing small plants and seeds during winter time. 


I begun by cutting some spruce pieces to size on the table saw. You can buy the pieces ready made and cut them to size with a hand saw and a miter box. 


I then glued and nailed the pieces together. 


To make the sides stronger I cut triangles to add on the corners as supports. I glued and nailed the triangles in place. 


Once I  had a cube ready, I started working on the roof. 


I cut the sides on the bandsaw and used a plane to clean the saw marks. I also opened holes to act as vents using a hole saw. The vents stay in place with dowels. 


I then sanded everything and applied a coat of linseed oil. 


Finally I added the covering and made a base so I can remove all the plants at once. 


I hope you like my little green house because that was it. See you soon with a new project video. 


Disclosure: Some of the links below are affiliate links, meaning, that at no cost to you, I get a small commission if you click through and make a purchase.