In this video I make a pendant inspired by ammonite fossils. I made it out of a sea snail shell and epoxy resin.
First of all I hot glued the shell on a base to keep it steady. I used a scrap piece from a woodturning project.
I then filled the shell with resin and de-gassed it in the vacuum chamber.
I tried turning it on the lathe but it was too hard to turn.
So I decided it to sand it as much as possible. Then I used a diamond disc on my rotary tool to cut off a slice. I used water to cool the piece down. I then choosed the most interesting piece.
I sanded from 100 to 320. Then I wet sanded from 400 to 1000. I polished it with my polishing pads and finally I buffed it.
I used my metal lathe to make a brass ring, I added a leather stripe and my pendant was ready. I think it came out really beautiful.
But that was it. See you soon with a new project video.
Disclosure: Some of the links below are affiliate links, meaning, that at no cost to you, I get a small commission if you click through and make a purchase.
In this video I make a palette knife out of a nail, a spatula, copper pipe and wood. This a pretty interesting tool used in a very impressionistic painting technique.
First of all I made a small paper template of the knife’s spatula part. I used the metal from a spatula I bought from the hardware store. The spatula needs to be flexible in order for the palette knife to work.
I then cut the shape of my spatula using a rotary tool and a metal cutting disc.
The spatula needs to be polished. You can do that using sand paper, sharpening stones or a sharpening system like my Tormek. The final polishing you can do on a leather strop. You can also use a buffing wheel with honing compound on your rotary tool.
Next I cut a nail and bended it with heat. To connect the spatula with the nail I used silver solder. Heat and flux pull the solder towards them.
I then cleaned and polished the metal parts again.
As a handle you can use a handle from another tool. But I turned one out of beech.
I epoxied a piece of coper pipe in front. Once I finished the handle I epoxied the metal parts in the handle.
This is a really interesting technique. It works better with oil paints because thy are pretty thick and dry really slow. But that was it. See you soon with a new project video.
Disclosure: Some of the links below are affiliate links, meaning, that at no cost to you, I get a small commission if you click through and make a purchase.
In this video I use a rotten burl from an unknown (to me) type of tree. I think that these fragile wood pieces hide a lot of beauty and resin can help a lot to preserve it. So I made a resin and wood blank and turned it on the lathe. I hope you like the result.
I spotted this burl on a tee in my neighbourhood. Once I touched it I realised I could remove it by hand. So I took it to make something out of it.
I first flattened one side on the belt sander.
Next I made a mold out of an old Ice cream box and a piece of plywood. I hot glued the mold on the plywood and I used a drop of silicone to seal it from leaks. To prevent it from floating in the resin I used rubber bands and a scrap wood piece.
I then mixed some epoxy resin and added some orange transparent dye.
I poured the resin into the mold and de-gassed in the vacuum chamber.
Once the resin was cured, I de-moulded it and found the centre of the plywood piece. I drew a few circles to help me align the piece on the glue chuck. I then epoxied the hole piece on the glue chuck.
Using plywood wasn’t the best choice. Plywood is really hard on woodturning tools. But that’s what I had.
I turned my piece true using a bowl gouge and a round nose scrapper. I also used a parting tool.
I sanded dry from 100 to 300. Then I started wet sanding using mineral oil from 400 to 1000. I then started polishing with my micro mesh sanding pads.
Next I parted the piece off the lathe and turned it around using my bowl bottom cleaning jaws. Same stuff again, scrapping sanding and polishing.
Finally I buffed the piece with my buffing wheel and carnauba wax.
Last but not least I made a base out of basswood. I cut the piece on the table saw and hand carved it give it some texture. I painted it black with water based stain.
And my little burl was ready. I really like looking at these strange beautiful shapes nature creates. But that was it. See you soon with a new project video.
Disclosure: Some of the links below are affiliate links, meaning, that at no cost to you, I get a small commission if you click through and make a purchase.
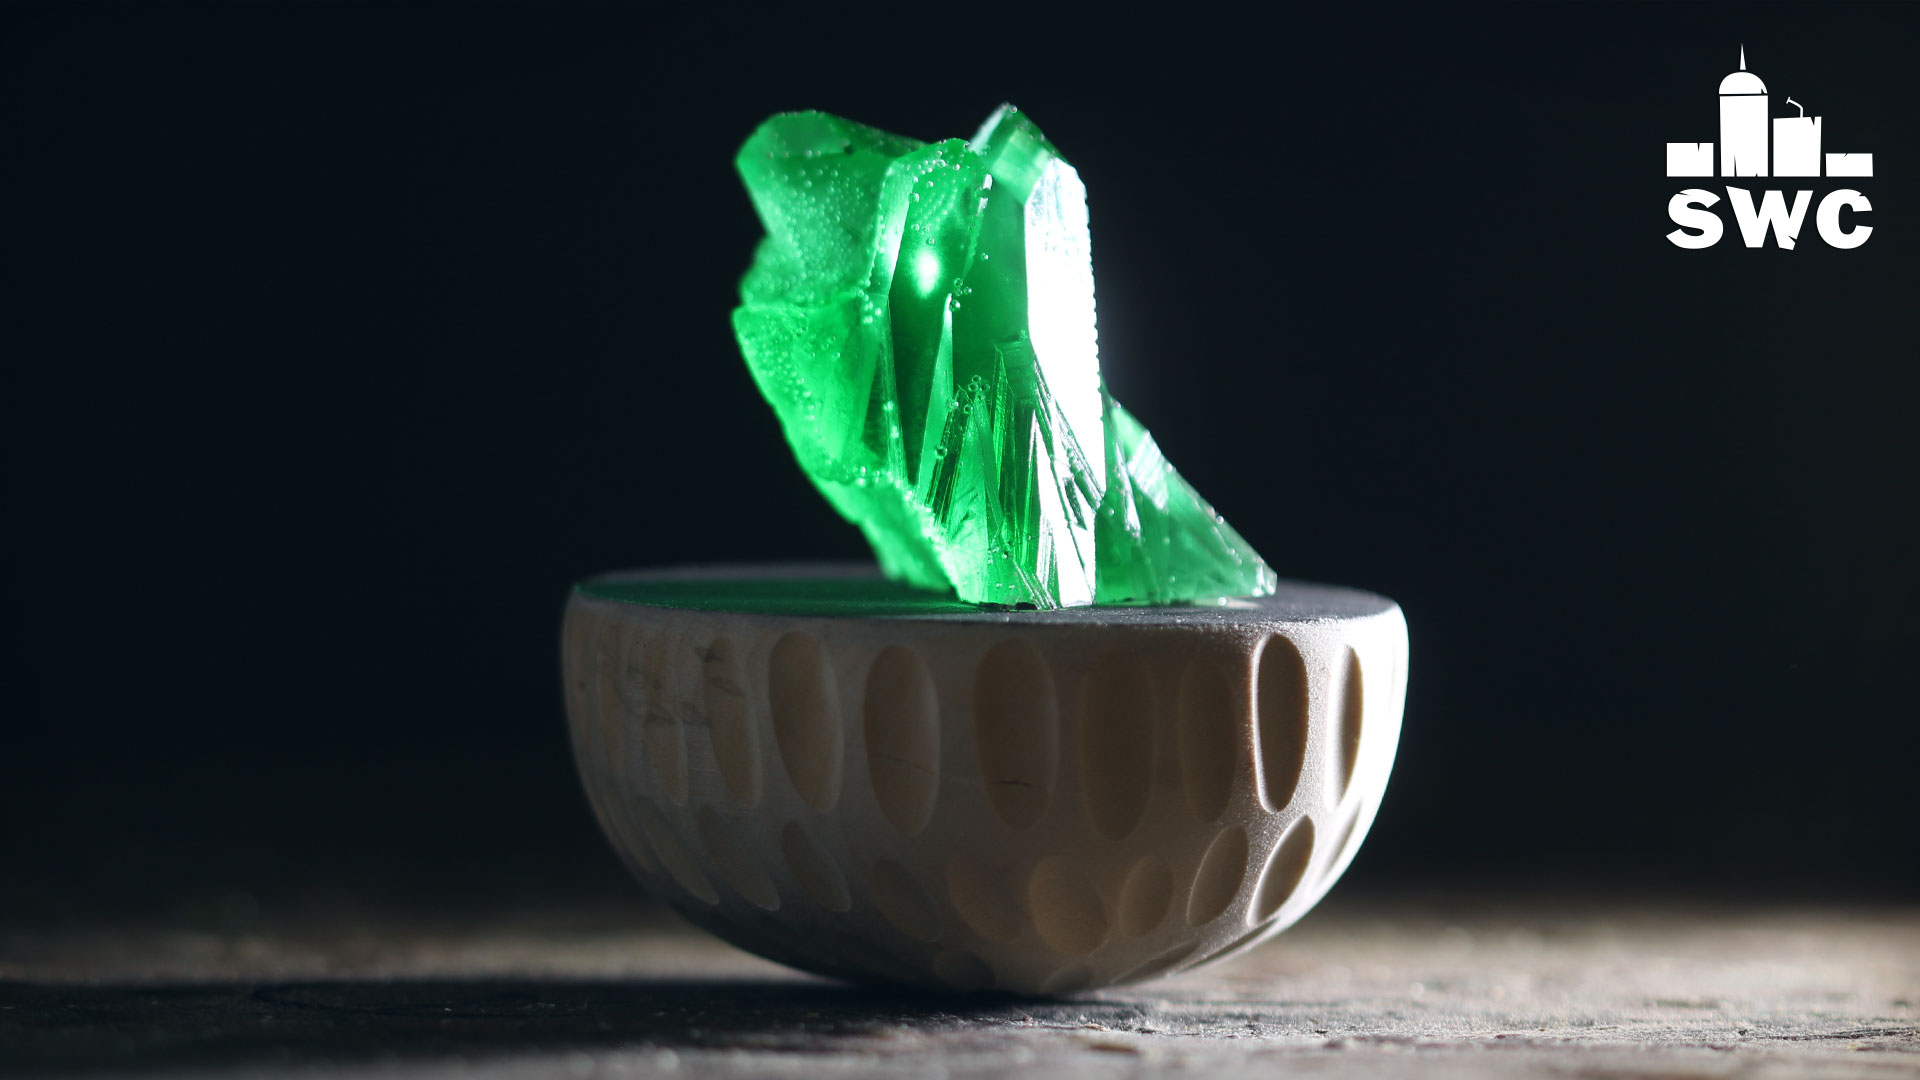
In this video I used a real quartz crystal to make a silicone rubber mold. Then I poured epoxy resin to make an exact duplicate. I then turned a base out of basswood, to place my little epoxy rock.
I used a plastic container from yogurt in which I hot glued the quartz rock. I then prepared some silicone rubber in which I added a drop of red pigment. I then poured the rubber into the mold and de-gassed in the vacuum chamber.
Next I cut the mold open to remove the crystal.
I then prepared some epoxy resin which I dyed transparent green.
I first degassed the resin itself and then poured it into the mold. I de-gassed again. I should insist on de-gassing more because I still got a few bubbles in the final cast.
I flattened the bottom of the crystal on the belt sander. Then I turned a base on the lathe out of basswood. I carved some decoration on it.
I epoxied the crystal on the base and painted the upper part of the base with latex paint.
And my little fake crystal was ready. I hope youliked my little Kryptonite project, but that was it. See you soon with a new project video.
Disclosure: Some of the links below are affiliate links, meaning, that at no cost to you, I get a small commission if you click through and make a purchase.