Wednesday, May 31, 2017

How to make a wooden serving tray, using mostly the table saw


I made this tray out of precut spruce lumber.

First of all I cut the frame of the tray. All the pieces have a 45 degree miter. To create that bevel I cut all the pieces using my 45 degree miter sled on the table saw.

The bottom panel of the tray slides in a groove which is created in the sides of the tray. I created this groove, by making a series of rip cuts on the table saw. I slightly moved the fence back until I reached a snug fit.

Using my cross cut sled, I cut all the pieces of the bottom to size.

I then glued everything together. The bottom pieces have just a few drops of glue because I want them to be able to expand and contract through climate changes.

During the glue up, I used a frame clamp. I also used a regular clamp to force everything to be square.

I then reinforced the corners with splines. I first created the grooves for the splines, using my spline making jig. I then cut out a few thin splines on my table saw and glued them in place. I trimmed them flush with a flush trim saw and a sharp chisel.

I then filled any gaps using glue and sanding dust. 

I chamfered all the outer edges with a block plane.

I made a jig to mark equal distances from the edges of the tray. I then drilled the holes that receive the rope handles. 

I sanded everything with 100 grit sandpaper.

I applied a coat of white stain. After that coat was dry I sanded the high spots with 240 grit.

I applied another coat of stain and then finished the tray with a protective coat of water based, clear, satin varnish.

I then added the rope handles. I secured them in place with a knot and hot glue.


My tray came out really nice and I am really happy with the way it looks!

Thursday, May 25, 2017

Turning a wooden bowl out of scrap wood


I made this bowl on the lathe, using laminated pieces of spruce, marine plywood and bamboo plywood.

First of all I laminated all the pieces together using wood glue and a clamp.

I then trimmed the piece on my bandsaw.

I mounted the piece on the lathe with a face plate.

I rounded the stock using a roughing gouge.

Using the bowl gouge, I flattened the bottom.

I used a caliper to measure the opening of my chuck.

I then created a mortise to fit my chuck using a skew chisel and a spindle gouge.

I used a flat chisel to scrape the outer side of the bowl and then sanded it with 100grit sand paper.

I then mounted the bowl on my chuck to begin the hollowing process.

To establish the depth of my bowl. I used a forstner bit on my tailstock to remove the core material of the bowl. I used a depth gage to make sure I did not drill too far.

I then used the bowl gouge to remove as much material as I could.

I then used a round scraper to smooth out the interior walls of the bowl. I also used a flat chisel to create steps which I then rounded over with the round scraper. This technique helps me remove material from difficult areas of the bowl.

I then sanded the bowl with 100grit, moved to 240, then 320 and 500.

I finished the bowl with Yorkshire grit which is an abrasive paste with beeswax, mineral oil and stone. You apply the paste and then smooth out the surface with a piece of paper while the lathe is set to spin at 500rpm or less.

My bowl turned out really nice! I hope you like it!


Friday, May 19, 2017

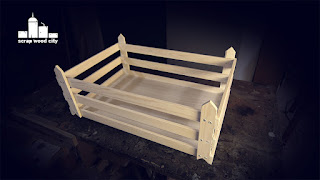
How to make a decorative wooden vegetable crate


I made this decorative piece from pre cut spruce lumber and a piece of 12mm MDF.

First of all I rough cut my material to length using a handsaw and my miter box.

I then taped all the pieces of the same length together. Using a crosscut sled on my table saw, I cut all the pieces to size with one cut.

Those kind of crates, are designed to be stacked one on top of another. To do that all four of their corners have an arrow with 45 degree bevels on each side. To create those triangular shapes, I tilted the blade of the table saw at 45 degrees. I then used a stop block on my cross cut sled. With one pass I created one bevel. I flipped the piece around and created the other bevel. To create an inner triangle, I simply moved the stop block on the other side of the blade. Of course to set up the stop block, I made a few tests on a scrap piece of wood.

I then predrilled, counter sinked and screwed the pieces with the triangles to place. For extra strength I also added a drop of wood glue. The screws I had were a bit longer than I needed, so I used my rotary tool with a cutting disc to trim the screws flush.

I then moved again on my table saw, and cut the rest of the pieces to size.

I connected all the sides together, using glue and nails.

I then cut the bottom of the piece from a piece of MDF on the table saw. I made a few cuts until the bottom fitted snuggly.

I secured the bottom in place with wood glue and nails.

I gave the whole piece a nice sanding with 100grit.

I applied a coat of water based white wood stain following the grain of the wood. After that coat was dry, I light sanded everything with 240grit and applied another coat of stain.

To protect the piece a little bit more, I added a coat of clear satin water based varnish.

My little crate was now ready. You can use it to store books or magazines. You can even add casters on it!


Thursday, May 11, 2017

How to convert your lathe into a DIY drum sander


A thickness sander is a really useful tool. The lathe can be easily converted into one.

I made this jig using a sheet of MDF and scrap pine pieces from an old bed. I found both of them in the garbage.

First of all I cut the MDF pieces to size, using a circular saw and my guide rail.

I then measured the gap on my lathe’s base with a caliper. I transferred  that measurement between the fence of the table saw and the blade. I cut a strip of MDF that fits snugly in my lathe’s base.

I then glued and screwed the strip in place.

I cut a piano hinge to size, with my angle grinder. I then attached the piano hinge in place with screws.

Using my cross cut sled and a stop block, I cut a few pieces of MDF to size.

In one of these pieces I traced the shape of a nut. I drilled an entry hole on the drill press and cut out the shape on the scroll saw. I then finished shaping the hole with a small file. I applied a bit of two part fast setting epoxy and hammered the nut in place.

To make a knob I glued two pieces of MDF together.

I drew two circles on a scrap metal piece and rough cut them out with the angle grinder. I then drilled a hole in their middle on my drill press. I used some WD40 to prevent my drill bit from overheating. I shaped the circles on my bench grinder. Using a file I removed any burrs.

Using the angle grinder I cut a piece of threaded rod. I created a bevel on the cut edge, using again the angle grinder. This helps the rod to be easily screwed in the female nut.

I then drilled some holes and added the threaded rods, the metal circles, washers and wing nuts in place.

I glued and screwed in place the piece with the glued nut.

To make the knob, I drew a circle, divided it in 6 and then drew  three circles with equal distances between them. I cut the shape of the knob on the bandsaw. I finished shaping it with a cylindrical file and sandpaper. I screwed a threaded rod in the center of the knob. I drilled a hole on the drill press and added a nail to act as a locking key. I secured the nail in place, with a drop of super glue.

Now to make the sanding drum, I used a chisel to detach the cylindrical piece of the bed. I cut it to size using the table saw and a cross cut sled.

With my center finder, I marked the centers on each end of the cylinder and used an owl to mark the center.

I mounted the cylinder on the lathe between centers and created a tenon to fit my chuck.

I remounted the piece on my chuck. I used a straight chisel to even out the cylinder. I sanded at 100grit.

I cut a thin strip of sandpaper and attached it on the cylinder with zip ties. 

My homemade thickness ( drum ) sander was now ready, and works really nicely!

Important note: If you make a similar build, don’t forget that you have to feed the material from the opposite side of the lathe. If you feed it the other way, the drum tends to catch the material and through it out!


Saturday, May 6, 2017

How to make a wooden box, for wedding wishes


In this kind of boxes, the guests of a wedding, place their wishes for the new married couple.

I made this box out of spruce wood and plywood. It’s dimensions are 40x20x18cm.

First of all I cut the pieces to size with my table saw. For the cross cuts I used my cross cut sled.

I then glued and clamped the sides of the box. 

After the glue dried, I added screws to all the joints. I first predrilled pilot holes and then counter sinked them before adding the screws in place.

I then nailed and glued the top and bottom pieces in place.

With a block plane I trimmed the sides flush.

I then sanded the whole piece flush with my orbital sander and 80 grit sandpaper.

Now I cut the top off using my table saw. Before the final cut, I clamped a shim in place to make sure that my cut would work out nicely.

I then applied wood filler to any imperfections.

I glued a few templates on a 12mm piece of birch plywood using spray adhesive. I then drilled all the entry holes on my drill press. Using a fret saw I cut all the pieces I needed. I then Sanded them using small files and sandpaper. I cut them all apart on the bandsaw. I sanded their outer sides on my disc sander. I used my heat gun to remove the paper templates.

I then glued and nailed in place the design element of the top.

To drill out the holes I needed, I used a small guide block I made. To prevent the drilling from splitting the wood I clamped two pieces of wood in place.

I then cut a few circular pieces on the bandsaw and sanded them on the disc sander.

I also used my table saw to cut four small blocks. I used a stop block on my cross cut sled to ensure I get all the pieces at the same size. 

I finished shaping the block on my disc sander.

I sanded the whole piece with 100grit and then moved to 280grit.

I then applied two coats of white wood stain while light sanding between coats. It is really important to apply the stain with the grain of the wood.

I added three coats of water based, teak color varnish to all the cut out pieces.

I finished everything with a clear protective coat of water based satin varnish.

I then predrilled and screwed the hinges in place.

I then  assembled everything with a string. The box has a string mechanism with which you can adjust all the elements the way you want. To make it easier to work with the string, I added a few drops of super glue in various parts. This helps the fibers of the string, to stay in place.

At this point my box is ready to receive some wishes!

I hope you like it!