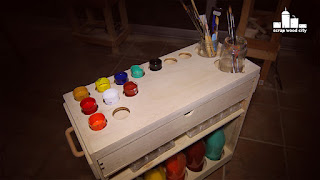
I made this art supplies cart out of 9mm plywood. It is really helpful to have all your painting tools and paints in one portable spot.
First of all I used my circular saw and a guide rail to cut a sheet of plywood to more manageable pieces.
The bottom part of the cart will receive plastic bottles full of basic color paints. Using a circle cutting jig on my router I cut circles to receive the bottles. I completed the circles with three passes.
I then cut the sides of the bottom part. I glued all the parts of the bottom together using my air powered nail gun.
Using similar methods I made the top part of the cart. This time I also used the hole saw to make smaller holes. Those will receive small containers. In those containers I can prepare the colors I need in larger quantities while I paint.
I then glued and nailed the sides of the cart on the top and bottom pieces. I reinforced the sides using screws. To install the screws nicely, I predrilled pilot holes and counter sinked them.
I then cut the back panel on the table saw. For the cross cut, I used my cross cut sled. I nailed and glued it in place.
I then cut the side supports for the shelves. I glued and nailed everything in place.
I cut the pieces of the drawer. I also cut a groove on their bottom in order to receive the drawer’s bottom panel. To open the drawer I used a forstner bit to create a semi circular opening. I glued nailed and screwed the drawer pieces together.
I then cut four rectangular pieces on the table saw, using my cross cut sled and a stop block. I glued them on the bottom of the cart and then screwed the wheels in place.
I added two pieces on the sides. Those will provide more support for the handles. Using a caliper I measured the distances for the handles. I also used the caliper to transfer the distance on the sides of the cart. I drilled the holes needed. I used a forstner bit to drill out material from the inner side of the holes. This way the screw heads won’t interfere with the drawers.
I then screwed the handles in place.
I then used some wood filler to cover up any gaps I had. After the filler dried out I sanded everything flush. I begun with a really aggressive 50 grit sanding disc, moved to 80 and stopped at 120. I did that with my random orbit sander. Using a disc I hand sanded all the edges.
I blew the dust off the cart with my air gun.
My cabinet was now ready. I needed a portable cart for my art supplies. This way I can easily store or use all my painting stuff when I have to do so!
I hope you like it and find it useful!


This would be perfect for my wife, she paints. I will have to make some modifications as she paints with oil paint but the concept will be the same. Thanks for the inspiration.
ReplyDeleteAwesome to hear that! :)
Delete