Monday, January 27, 2020

Restoring a wooden bar stool I found in the garbage - DIY


Tools and materials I propose:

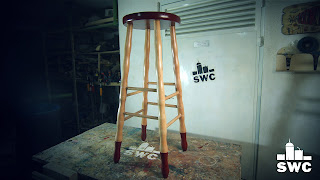
In this video I restore a bar stool I found in the garbage. The stool is made out of solid beech wood and MDF. It was an interesting project and I learned a lot of stuff in the process.

I begun by stripping the wood out of the old paint jobs. I used my heat gun and a spatula. This worked but it was a bit slow. So I used some paint stripper gel to remove the paint really fast. But be careful when using this stuff because it is really toxic. 

I also used the heat gun to melt the glue in all the joints in order to break the whole thing apart. 

To clean the paint I also used my random orbit sander, chisels and my rotary tool at really slow speed and a sanding bit. 

The stool’s top had a big hole. I filled the hole by shaping a spruce dowel  to size using my table saw. 

I filled all small cracks with super glue and wood dust. 

I gave the top a round over using my spoke shave and sand paper. 

I glued the stool back together in stages. First I glued the two pairs of it’s legs, Then I glued the legs together and finally I glued the legs on the top. This made things much easier. 

Finally I masked the legs and painted them and the top deep red with latex paint. I applied two coats in total. The heat gun helped me speed up the drying process.

Finally I finished the piece with two coats of clear, water based, satin varnish.

My stool came out great and I learned a ton of stuff trying to restore it. But that was it, see you soon with a new project video.


Disclosure: Some of the links below are affiliate links, meaning, that at no cost to you, I get a small commission if you click through and make a purchase. 

Tuesday, January 14, 2020

How to use a spokeshave - Woodworking hand tools


Tools and materials I propose:

In this video I show you how to use one of my favourite hand tools. The spokeshave is a cheap but really useful tool. With a little bit of practise it can help you in many woodworking situations.

The spokeshave is just a base with two handles on which you mount a blade and secure it in place with a cap.

Like most woodworking hand tools with a blade, you have to keep it sharp in order for it to work properly. To sharpen the spokeshave, my hand planes and my flat chisels I use the same technique. I use a two grit oil stone, a guide, a leather strop and my bench hook. 

I place my blade in the guide and try to match it’s angle. I also like to mark the bevel of my blade with a sharpie so I can keep track of my progress. Then I add some oil on my stone and start sharpening my blade. Once a tiny hook (burr) starts to from under the blade I turn the stone upside down and continue sharpening with the finer grit. Once I have a bevel throughout the whole blade I take the blade off the guide and remove it on the stone. Then I add some honing compound on my leather strop and about 30 strokes later my blade should be razor sharp. I also like to to use my honing diamond files. After each time I work with my tool I give it a quick sharpening with my diamond and I keep my tool really sharp all the time. 

You can adjust the depth of cut. The more the blade extends the thicker the savings. You can also have the blade tilted. So with one side you create thicker savings and with the other you get a cleaner cut. 

With the spokeshave you have to pay attention to the grain of the wood. If you get tear out, chances are you are going against the grain. So you have to turn the tool or the wood 180 degrees around. 

I like to use the tool a bit skewed. It seems to cut easier this way. And this definitely helps when cutting end grain. 

With the spokeshave you can create round overs and bevels at long pieces. But this you can do with the block plane as well. The thing is that the spokeshave can do the same stuff with curved pieces on which the regular flat plane cannot reach.

It is definitely one of my most beloved tools. And with a little bit of practise you would love it.

But that was it. See you soon with a new project video!


Disclosure: Some of the links below are affiliate links, meaning, that at no cost to you, I get a small commission if you click through and make a purchase.

Thursday, January 9, 2020

How to make a frozen ring, out of beech wood and epoxy resin


Tools and materials I propose:


I made this ring out of a small piece of beech and epoxy resin. I used resin dyes to create a kind of cold clouds over snowy mountains effect. 

I begun by cutting the wood to size on the bandsaw.

I then used a V carving chisel to create the mountain shapes on my wood. 

I painted the mountain picks with white latex paint. I then sealed the paint with a coat of epoxy. 

To prevent the piece from floating into the mold I taped it down with a small wooden block. 

I then mixed some clear resin and degassed it in the vacuum chamber. I poured the resin into the mold and added some blue glitter dust. I degassed again.

Then I mixed the resin with three different dyes to create my ice effect. I then added some drops from each dyed resin into my mold and gently mixed them together.

Once the resin was fully cured, I used a 15mm forstner bit to create the ring’s hole. I then cut the basic shape of my ring on the bandsaw. I shaped my ring in a kind of diamond shape on the belt sander. 

Then it was just a matter of sanding, polishing and buffing.

I begun sanding at 220. I moved on to 320. At 400 I started wet sanding with soap water. Next, 500, 600, 800 and 1000.

I then started the polishing process with my micro mesh sanding pads which go from 1500 to 12000.

Finally I used my buffing wheel system to create a mirror shine finish. My system has three wheels.

I am really happy with my little frozen ring. It’s pretty cold in Greece now and the weather kind of inspired me for this project.

But that was it. See you soon with a new project video.


Disclosure: Some of the links below are affiliate links, meaning, that at no cost to you, I get a small commission if you click through and make a purchase.

Thursday, January 2, 2020

Die-cast model cars in resin - diorama experiments


Tools and materials I propose:

In this video I am experimenting with a couple of 1:64 hot wheels model cars. I wanted to make dioramas and pour resin over them. After turning and polishing the outcome was pretty interesting.

I wanted my first diorama to be a sunken car . So I wanted it to be covered in  moss. I first drilled the rivet heads at the bottom of my car, so I could tear the model apart. I then used some paint stripper to remove the paint. 

Next I used an axe to cut a piece of wood. This would act as my base. The texture of the wood would give a nice base to create a rocky effect. I then glued the car, some rocks and a piece of tree on to the wood with 5 minute epoxy. 

To create the moss texture I used saw dust and wood glue. I first thinned the glue with water and brushed it on to the surface. Then I added the dust. Then using my airbrush I painted the diorama trying to mimic the bottom of a river. I used a grey base coat, a few greens and dark red colour. 

I then made a mold out of plexiglass and PVC pipe. I mixed some resin and I added a drop of blue and green dye. I then degassed the resin in the vacuum chamber and poured it into the mold. 

Next I cut the mold open. At this point I realised that the casting was full of big cracks. I think this was the result of pouring too much resin in one casting session. Anyway I decided to turn and polish the piece and study the result. 

To mount the piece on the lathe, I epoxied it on a small wooden adapter that fit my chuck’s jaws. 

I then turned the piece on the lathe. I sanded and polished the piece. 

Next I wanted to make a kind of abandoned car in the desert effect.

I first sanded the car with 400grit. 

I used my rotary tool with a sanding bit to carve the desert’s surface on a piece of wood. I then added dust and pointed the pieces with the airbrush.

To create the rust and mud effect I used a small brush and a bamboo stick. Then I glued all the pieces on the wood with epoxy. As bushes I used green steel wool. 

Next I used some foam paper to make the mold. I sealed the mold with silicone. 

I mixed some clear resin, degassed it and poured it into the mold. This I time I did three different pours and everything worked out great. 

I then mounted the piece on the lathe and turned it. I used my bowl gouge for this top.

I sanded the piece with 100, 220 and 320 grit. At 400 I started to wet sand until 1000grit. The I used my micro mesh sanding pads that go from 1500 to 12000. 

Finally I used my buffing kit to polish the piece.

Although the first idea didn’t wok out so nicely, I really enjoyed these projects because I learned a lot of stuff. But that was it, see you soon with a new project video. 


Disclosure: Some of the links below are affiliate links, meaning, that at no cost to you, I get a small commission if you click through and make a purchase.