Thursday, November 24, 2016

How to make a swan neck hollowing wood turning tool from an old file


With a tool like that you can hollow forms because it can penetrate in really difficult areas.

I made it from an old file, because files are made of tool steel, which should work nicely on a project like this one.

First of all I cut the steel to size with my angle grinder. I also used the angle grinder to remove most of the file marks.

I finished cleaning on my belt sander.

I then used my tilting base on the grinding wheel to grind the bevel of the tool at a consistent angle.

I heated the tool to red hot with my propane torch. I used two metal bars mounted on my bench, and while it was still hot I bended the steel to shape. I repeated this process a few times, until I was happy with my tool’s shape.

I then placed the steel in my home made foundry and when it became red hot I dipped it in oil to harden it. To reduce the tool’s hardness and prevent it from snapping I put it in the oven for 2 hours at 180 degrees Celsius.

I cleaned the tool with sandpaper and oil. I also used my rotary tool to clean the curvy parts.

I cut a piece of maple on my bandsaw, and used my chisels and a mallet to carve a groove for the tool to sit in.

I glued the pieces together using wood glue and clamps. 

I mounted the handle on the lathe and used a spindle gouge to round it over. 

I used my rotary tool to cut a piece of metal tube.

I created a tenon to receive the tube. I used the scraper to make a curve and the skew to round over the back. I used a spindle gouge also. I sanded the piece on the lathe and finished with mineral oil.

I used my home made disc sander to sand the metal ring flush with the tool handle.

I glued everything together with two part 5 minute epoxy glue.

I sharpened the tool using several grits of sand paper, a wood sanding block and oil. I finished with a piece of leather with polishing compound. Every time I created a burr I removed it and moved to a finer grit.

At this point my tool was ready. I think it will come out really useful in future wood turning projects.

I hope you liked it!


Friday, November 18, 2016

How to make a DIY lumber rack


I needed a place in my shop, that would be dedicated for storing lumber.

I made this rack out of spruce boards and screws.

I cut the pieces of the same length all together. I clamped them together and used a mallet to set them in line. I then used my circular saw with a guide rail to make the cross cut.

I begun the build by making the sides. I made pilot holes and screwed everything in place.

After the two sides were ready I added the cleats, again with screws. I also used a 90 degree straight edge, to make sure everything was straight.

I then cut the inner braces to size, with a handsaw and a miter box. To hold them in place before screwing them in, I used a piece of rope and a piece of wood in the way a bowsaw blade tension can be adjusted.

At this point the carcass of the rack was ready. I can add more shelves or compartments in future if I have to.

I hope you like it.


Wednesday, November 9, 2016

DIY pallet wood toy warrior on the lathe


I had a long thick block of wood from a pallet and I decided to make a wood turning project with it.

First of all I cut the piece to size using my bandsaw. 

I used a draw knife to remove as much material as I could, before mounting the piece on the lathe.

I then rounded over the piece on the lathe. I used a  carpenter’s curved chisel as a roughing gouge to do that.

I then made a template of my piece on a piece of heavy paper. I used the template to establish my basic lines on the lathe. I then used a skew chisel to kind of carve the basic shapes on my piece.

I measured the template with my caliper quite often to establish the basic shapes on my blank.

I then used the skew chisel, a spindle gouge and a flat chisel to turn the body of the warrior.

I sanded the piece and removed the tailstock to turn the head. I sanded the piece with 100 grit sand paper.

I drilled the holes for the arms. I enlarged the holes gradually, by using several drill bits. I also made two holes to act as eyes.

I cut the body to size on the bandsaw and sanded the bottom on my lathe disc sander.

I then turned the arms and the sword. The sword is attached to the arm with a hole, which I made on the drill press. To flatten the blade of the sword, I used my disc sander again.

I then turned the shield of my toy warrior. I drilled a hole in the center using the lathe’s tailstock with a drill chuck. I removed the shield with my parting tool. I cleared the back on my disc sander. I also turned a small pin that fits in the shield. 

I glued the pin in the shield. I also glued in the arms. I wanted the shield and the sword to be removable.

My little warrior toy was now ready. Pallet wood is not ideal for wood turning because it chips really easily.

But I think it was an interesting project and turned out nicely in the end!


Saturday, November 5, 2016

Pine bowl on the lathe


I made this a bowl from a piece of over 40 years old pine tree.

No video for this one, it just came out really nice. The top is made of scrap plywood and spruce.

I finished the pine with mineral oil. The top is painted with acrylic and clear varnish.

The grain patterns are really impressive on this piece, I hope you like it.

Thursday, November 3, 2016

DIY Santa claus for Christmas Ornament Challenge 2016


I made this Santa out of of bitter orange and lime tree pieces. 

First of all I chucked the bitter orange piece on my lathe and turned it true using my scraper tool.

On a piece of cardboard I designed and cut out half of my Santa’s template. I wanted a simple minimalistic design.

I then used the template to mark my lines on the lathe. I used a skew chisel to establish my measurements. I then used the parting tool to remove material and kind of create my basic forms.

To round over a few parts and to create the cone for the head I used my spindle gouge. 

After I was happy with the shape I sanded the piece on the lathe.

I cut of the base on my bandsaw. I sanded the bottom using my homemade disc sanding jig for the lathe.

I then chucked the lime tree piece between centers and turned my Santa’s arms. I used a regular straight chisel to do that.

I then drilled the arm holes on my drill press. To hold the piece down I placed it on a wooden base with a hole in the middle. 

I glued the arms in place and drilled two holes to act as eyes.

I then drilled a pilot hole and added a metal hanger on the Santa’s head.

I painted the piece with acrylic paints. I finished by spraying a few coats of clear acrylic varnish.

My Santa was now ready. 


Check out more information about the ornament challenge and the other entries on those links:


Friday, October 28, 2016

How to make a DIY designer’s desk


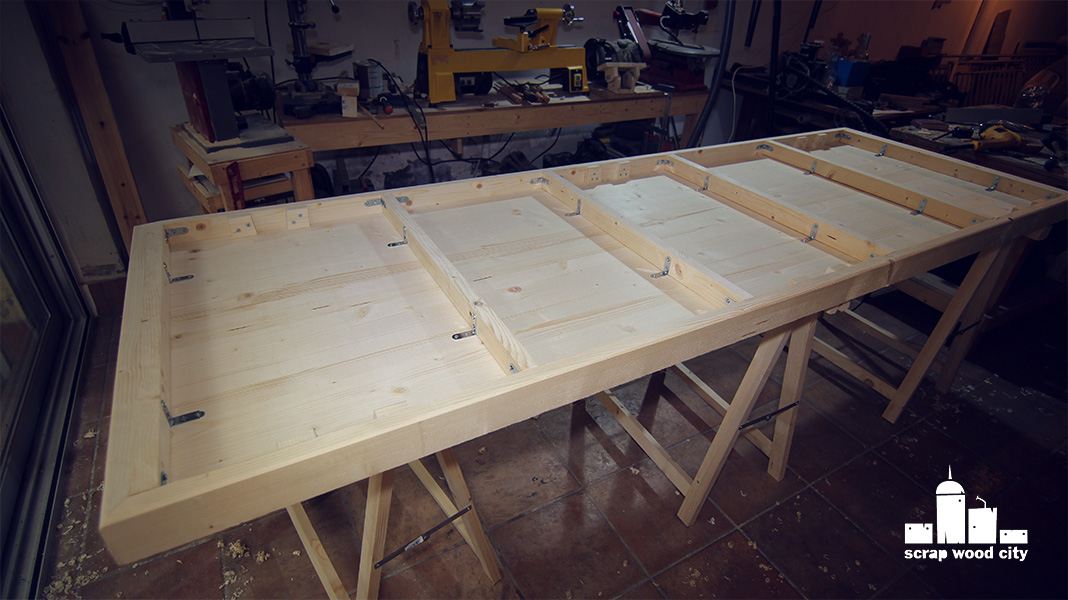
I wanted a large double desk for two people. I made it out of a spruce panel, three saw horses and spruce boards. I wanted everything to be removable, so I joined it all using screws and metal corners.

It’s design is industrial looking and I like the fact that it kind of reminds me construction site because of the saw horses. 

I begun by making the main frame. I used my circular saw and a guide rail to cut the 45 degree miters.

I then used my table saw, to rip cut the cleats. I did a bit of cleaning with my block plane. 

I predrilled pilot holes and screwed the side cleats to the sides of the frame. 

To hold the frame together before screwing it together, I used corner clamps. I joined the pieces of the frame using screws and metal corners.

I cross cut the cleats to size, using my cross cut sled on the table saw.

To clamp the sides so I can add the cleats, I used a piece of string and tightened it just like bow saws do. I then installed the cleats with screws and metal corners again.

Using my circular saw and a guide rail again, I cross cut the desk top panel to length. I used again the circular saw, only this time I freehanded the rip cut to rough size. I then used my block plane to trim the sides so that it fitted just right in the frame.

I then secured the panel to the frame using screws and metal corners, once again.

I marked the dimensions of the saw horses and trimmed them to size using the bandsaw.

I then made a few stop blocks on the bandsaw so that the saw horses stay in place. I made the miters  on the blocks using a spirit level so that the saw horse kind of sits straight. I screwed the blocks in place.

I then used the block plane to clean up, to round over the edges and to plane the sides flush to the desk’s top. 

I sanded everything. I also filled a few gaps using glue and sanding dust.

I cleaned all the dust with my vacuum and applied six coats of clear, satin, water based varnish on the desktop. I sanded between coats with 240 grit sand paper.


My desk was now ready. I hope you liked it.

Wednesday, October 19, 2016

How to make a DIY spoon carving gouge


This spoon shaped chisel is designed to reach deep and difficult areas in a wood carving situation.

I made it from an old file ( because files are made of really hard tool steel ) and a piece of maple.

First of all, I used my angle grinder to cut the file to the basic shape I needed.

I then used the belt sanders and the bench top grinder to shape my file even more and clean up the file lines.

This gouge has two curves. To make them, I heated the steel and bended it against a metal cylinder and a sledge hammer that were both mounted on my bench. I heated it using my propane torch.

The tip of the carving gouge must a have a curve. I heated the tip to red hot, and then hammered it against the ball of a ball headed hammer. With my basic curve forged, I moved to the belt sander to grind my basic bevel.

I then heated my tool to red hot and dipped it in oil to harden it.

To give the blade a bit more flexibility ( to avoid snapping ), I heat treated it in the oven at 180 degrees Celsius for about 2 hours.

I then cleaned the steel with 100 grit sand paper and WD40. To remove any burrs, I rounded a piece of wood with my block plane and sand paper. I mounted a piece of sandpaper and the wood on a vise and used it as a curved sanding block.

I cut a piece of maple on my bandsaw, to make the handle.

Using my chisels I opened up a groove to receive the tool. I then glued the two pieces together. 

I clued a piece of plywood on the end of my handle ( the one with the open hole ).

I mounted the handle on my lathe and used the scraper tool to round it over. I used the skew chisel to make the handle’s back. 

Using my rotary tool I cut a piece of metal tube. I measured the diameter with a caliper. I turned the edge of my handle to match that diameter. I used a parting tool, the skew chisel and a spindle gouge to do that.

I then finished the shape with the spindle gouge, sanded the piece and applied a couple of coats of beeswax and olive oil finish.

I cut the excess pieces on the bandsaw. I also shaded the metal ring flush with the handle, using my homemade disc sander for the lathe.

I glued al the pieces together with two part epoxy glue.

At this point, I decided to change the grind of the tool before sharpening it, so I moved to the belt sander again. Only this time I had to dip the tool in water from time to time, to prevent the tip from burning and losing it’s hardness.

I sharpened the tool on my two grit oil stone. When I reached to a burr I removed it with a cylindrical stone.

I then stropped the tool on a piece of leather, on which I had applied polishing compound. I removed the burr again by rubbing the tip against the sanding block I made earlier. Only this time, it had leather instead of sand paper.

At this point, my tool was ready and razor sharp. I hope you liked it!