Monday, December 23, 2019

How to duplicate small items with silicone molds and epoxy resin


In this project I used resin related products from ResinPro: 

Tools and materials I propose:

In this video I duplicate a small cross. I first made a silicone rubber mold. Then I cast epoxy resin into the mold to create an exact copy of the original item. 

My small cross was missing its hanger. So I used the bandsaw and the belt sander to create a small wood block. This acts as a funnel for the resin and it also gives me some “meat” to create a new more robust hanger.

I used a small plastic piece of packaging as a mould for the silicone rubber. I hot glued the cross into the mold. 

I then mixed my two part silicone rubber. The one I used dries white and uses a 1:1 ratio of part A and part B. 

I degassed my rubber into the vacuum chamber and then poured it into the mold. 

In about 5 hours my rubber gold was ready.

Using an exact knife I carefully cut through the mold in order to remove the cross.

Next I mixed some epoxy resin. I added a drop of white dye and some white mica powder into the resin. I degassed the resin in the vacuum chamber and then poured it into my mold. To prevent the resin from leaking I closed the mold with tape and rubber bands.

In a few days, the resin was cured. I cut the funnel off the casting, drilled the hanger’s hole and shaped the hanger. I polished the casting a little with my micro mesh sanding pads.

To give to my casting a little more character. I first sprayed it with a coat of silver paint. Then I sprayed some black paint on a piece of plexiglass. With a small brush I applied  some black paint. While the paint was still wet I wiped it off with a rag. This left some dark spots on the backs. Then with a piece of 400grit sand paper, I sanded the edges of my cross to highlight the high spots.

And I was done. I hope you liked my little tutorial, because that was it, see you soon with a new project video. Until then Merry Christmas and a happy new year.


Disclosure: Some of the links below are affiliate links, meaning, that at no cost to you, I get a small commission if you click through and make a purchase. 

Tuesday, December 17, 2019

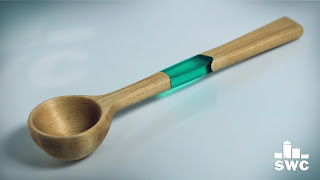
Making a spoon out of basswood and epoxy resin


Tools and materials I propose:

In this video, I make a wooden spoon, out of resin and basswood. I used both hand tools and power tools to make it. 

I begun with a flat and square piece of stock on which I designed my spoon on all faces. 

I then used a big bent carving gouge to start hollowing my spoon. I used a small cardboard template to check how deep I was. At some point I used a smaller gouge to reach a few tighter spots. Once I was 90% done I stoped hollowing.

Next I cut a piece off on my bandsaw. I wanted to fill this area with resin. I glued the pieces back together with hot glue. I also added tape to make sure my resin could not escape. 

I mixed some resin with green dye and I degassed it in my vacuum chamber.

I then poured the resin into the hole and let it cure for a few days.

Next I cut my spoon on the bandsaw. Once I did the cuts on one axis, I glued the pieces back together with hot glue and did the cuts on the other axis.

With my spoon’s basic shape done, I used the spokeshave to finish shaping. When you get  bad cuts with the spokeshave you should turn it around and cut with the grain of the wood.

Once I was done with the spoke shave I switched to a flat and a round file to even up all surfaces. 

I also used a spoon carving knife and a regular carving knife to fine tune the shape of my spoon.

Finally I started sanding with 100grit. To sand the cavity of my spoon I used a home made spherical sanding bit for my lathe. I then moved on to 220 and 320grit. I started wet sanding with mineral oil at 400grit until I reached one thousand grit. I polished the resin part with my micro mesh pads which go from 1.500 to 12.000 grit.

Finally I buffed with my buffing wheels.

My spoon came out great. But that was it, see you soon with a new project video!


Disclosure: Some of the links below are affiliate links, meaning, that at no cost to you, I get a small commission if you click through and make a purchase.

Thursday, December 12, 2019

How to make a simple solid wood table top


How to make a simple solid wood table top

Tools and materials I propose:

In this video I make a simple table top out of solid basswood. 

First of all I planed one side of my material flat. I then squared it with one more side on the jointer/planer.

With two sides flat and perpendicular to each other , I squared the third side on the table saw. 

Finally I passed all the boards through the thickness planer and my material was now flat and square. 

I then aligned the boards so that I liked the grain orientation. I then added alignment marks and also marks for the biscuits. 

I used my biscuit joiner to cut the slots for the biscuits. The biscuits hold the boards from sliding around during the glue up. 

I glued the top in three sessions. This way I had less stress about the glue drying. And I think it also helps to glue the pieces nice and straight. I also used a few boards to keep the glued pieces from bending. 

Once the two pieces were ready I glued them together. I also like to clean the excess glue with a wet rag. This saves me some time on sanding.

Once my top was ready, I used my circular saw and a guide rail to cut it to it’s final size. 

I did my rough sanding with 80 grit and my belt sander. 

I then rounded over the top edges with a block plane. Finally I sanded everything with 120, 220 and 320 grit. 

I finished the piece with water based, clear satin varnish. I applied several coats ( around 5 ) while lightly sanding between coats with 400grit. I also like to use my heat gun to speed up the drying process. 

I finished the underside first. Then I screwed the top on the table’s metal base. To avoid splitting I first predrilled pilot holes and then screwed the wood in place. 

Finally I flipped the table over and finished the top. 

The table came out great. But that was it, see you soon with a new project video!


Disclosure: Some of the links below are affiliate links, meaning, that at no cost to you, I get a small commission if you click through and make a purchase

Saturday, December 7, 2019

How to make a big wooden mallet


Tools and materials I propose:

I made this mallet out of a 40mm spruce dowel and a small log I had in the shop. Due to it's size it was pretty challenging to make it! So I used a few interesting techniques to make it. 

I begun by cutting my log, roughly to size with my electric chainsaw. 

Using a chisel and a drawknife I cleaned the bark off the log. It had started to rot and I didn’t want to inhale all that stuff while woodturning. 

I then used my centre finder to locate the centres on each side of the log. 

I set the lathe at a low speed and used my roughing gouge to turn the piece true. Once it was pretty round I increased the speed of the lathe. 

I squared the ends with a parting tool. 

I filled any cracks with super glue and wood chips. 

With my bowl gouge I rounded over the edges of my cylinder. With a flat chisel I turned the cylinder straight. I roughly sanded with 100grit. 

I cut off the excess wood on the sides with a handsaw. Next I sanded everything flush with my random orbit sander. 

Using a forester bit on my electric drill, I drilled the hole for the handle. 

The handle is a 40mm spruce dowel. I used the same forstner bit to mark how much material I had to remove from the dowel. The I used a simple set up on my table saw to resize my dowel in order to fit snuggly in the hole I had created earlier. 

The handle was longer than my lathe could handle. But using a steady rest and a chuck, I managed to mount it on the lathe and do all the necessary work. 

Basically I created a slight taper. I used my skew chisel to create grip grooves and a wire burner to add decorative burn marks. I then cut the handle off the lathe and sanded it’s bottom on the belt sander. 

Finally I glued the handle in place and finished it with mineral oil!

It came out nice and I think it will be pretty useful to have in my shop. Because the mallet is pretty heavy, you let it’s weight do the job for you.

But that was it, see you soon with a new project video!


Disclosure: Some of the links below are affiliate links, meaning, that at no cost to you, I get a small commission if you click through and make a purchase.

Saturday, November 30, 2019

How to make a friendly nutcracker out of beech - Woodturning


I really want to thank SKIL for sending me many power tools which I use every day:

Tools and materials I propose:

Making every day items with a more friendly design is something I really like. So enjoy my little nut cracker. I made it out of beech wood and a couple of metal parts. 

First of all I flattened and squared my stock on my jointer planer machine.

I then cut my pieces to size on the table saw. 

I glued a few parts together to make my blanks thick enough. Once the glue dried I re-flattened my pieces on the jointer. 

To make the hat of my character, I connected two pieces with an 8mm dowel. 

I used my drill press and a drill to create the holes needed. For the larger holes I used a forester bit. It’s always easier to create your holes while your material is still square. 

I then used my roughing gouge and a bowl gouge to basically do all the shaping needed on the lathe. 

Using a forstner bit on my tailstock I drilled the hole for a big nut.  I added my machinist’s chuck on the lathe and used my grinder to reduce the diameter of the nut. I finished shaping with a file. I then glued the nut in place with 5 minute epoxy. 

Using a screw chuck I turned the hat of my nut cracker. With the skew chisel I created two grooves. Then I used my wire burning tool to add a couple of decorative burned lines. I then drilled a hole on the hat and epoxied a threaded rod in it. I sanded the end of the rod on the belt sander to work a bit smoother. 

On the screw chuck I also turned the nose of my character. I glued the nose in place. I sanded everything with 100, 220 and 320 grit sand paper. 

I finished my nut cracker with food safe mineral oil!

My nut cracker came out awesome. But that was it. See you soon with a new project video!


Disclosure: Some of the links below are affiliate links, meaning, that at no cost to you, I get a small commission if you click through and make a purchase.

Saturday, November 23, 2019

Make a spinning top with an acceleration handle


I really want to thank SKIL for sending me many power tools which I use every day.


Tools and materials I propose:

I made my little spinning top out of beech wood. Please note that every year Greek woodturners and makers unite. We make spinning tops and toys for a good cause. The event is called Top Battle and you can find more info about it here.


First of all I roughly planed my material flat with my electric planer. This saved me a lot of time and effort. 

I then cut my blanks on my table saw. 

It’s much easier to drill all your holes while your material is square. Then you can turn it round on the lathe. 

Using the skew and a bowl gouge I shaped my top. A burned wire line gives a more vintage look on my tops. With my rotary tool I predrilled a pilot hole and then inserted a nail at the bottom of my top. I finished my top with carnauba wax. This a friction finish like wax but it’s more durable. 

I then made the acceleration handle. This time I used forstner bits to drill my holes. I finished it with food safe mineral oil. The same with the string handle. 

I sealed the ends of my string with some beeswax. 

The way this toy works is simple. You just insert the top in the handle and then wrap the string. You pull the handle and the top spins for a really long time.

My top came out great, but that was it. See you soon with a new project video!


Disclosure: Some of the links below are affiliate links, meaning, that at no cost to you, I get a small commission if you click through and make a purchase.

Wednesday, November 13, 2019

Making a big spinning top for a good cause


Tools and materials I propose:


Every year Greek woodturners and makers unite. We make spinning tops and toys for a good cause. I made my this year's top out of a strange piece of wood I found in the garbage, and some brass scraps. The event is called Top Battle and you can find more info about it here: https://tinyurl.com/yhyekudm

I begun by cutting my log to size with my cordless chainsaw. 

Next I mounted the blank between centres on the lathe and turned it true with a roughing gouge.

Once the blank was pretty round, I increased the speed of the lathe so I could work a little bit faster. 

I shaped my top using mostly the roughing gouge, a bowl gouge and a spindle gouge.

Using the skew chisel, I created dovetailed tenon so I could mount the top on my chuck jaws. 

I made the tip of my top out of some scrap pieces of brass I had in the shop. To work with the brass pieces on the lathe I used my machinist’s chuck. I used my files to shape the tip. The lathe was set at low speed. I then drilled a hole on one piece and shaped another piece as a dowel. Finally I glued the tip and the dowel with epoxy. I also glued the whole brass tip in the top using 5 minute epoxy as well. 

I made a small adapter out of beech for my tailstock. This way I could hold the top between centres and get less vibration. 

I used a bowl gouge to finish the shaping of my metal tip. This was not ideal but I took it slow and it worked. I finished the job with sandpaper. 

I then finished the overall shaping of my top. With my skew chisel I created three grooves. Then I used my wire burning tool to burn three black lines. This kind of gave a traditional look to my top.

I found the wood in the street so I thought it would be a good idea to apply a coat of wood preservative. This should kill any bugs that might have lived in the wood. 

I then sanded with 220, 320 and 400grit. I wet sanded with mineral oil and 500grit. 

I polished the top with abrasive paste. I applied one coat with the coarse grit and one with finer paste.

In these kind of projects I really like using beeswax. The friction from the lathe melts the wax. Then I wipe off the excess and this leaves a really shiny surface that looks awesome.

Finally I cut the top off the lathe and polished the end grain of the handle. I used the heat gun to melt the wax and apply it. 

And my top was ready. I am really happy with the way it came out! I wish all the best to the participants of the Top Battle 2019.

But that was it. See you soon with a new project video!


Disclosure: Some of the links below are affiliate links, meaning, that at no cost to you, I get a small commission if you click through and make a purchase.

Tuesday, November 5, 2019

How to fix a cracked wooden sphere with epoxy resin


In this project I used resin related products from ResinPro: 

Tools and materials I propose:

About a year ago I made an apricot wood sphere. It cracked really badly. So I decided to fix it with epoxy resin. 

I wanted to kind of emphasize the cracks. So I used a chisel to split the sphere apart. I then used my heat gun to shape a piece of plexiglass into a mold. I used tape and hot glue to secure the pieces of the mold. I poured water into the mould to check for leaks. And I had a small one which I repaired with hot glue.

I hot glued the sphere parts together and then glued the sphere into the mold to prevent it from floating into the resin. I also added scrap wood  pieces into the mold to save me some resin. 

I mixed the first portion of resin with some mica metallic powder. I did the first pour and degassed the resin in my vacuum chamber. This also helped the resin penetrate into every single spot. After a few days I did the second and final pour. 

Once the resin was cured, I broke the mold and cut it’s sides before mounting it on the lathe between centres. 

I used the roughing gouge to turn the blank true. Then I used a round scraper and a spindle gouge to shape the hemispheres. 

Then I chucked the sphere into my sphere making adaptors. I used a classic sphere making technique to make the sphere. You just remove the high spots and then turn the sphere around and repeat the process. Once the ghosting effect disappears you get a nice round sphere. 

I sanded the sphere from 100 to 400grit. Then I wet sanded with mineral oil from 500 to 1000grit. I polished the sphere with my micro mesh pads from 1500 to 12000grit. Then I buffed the piece on my buffing wheels.

My sphere came out great. I was really sad that it had cracked in the first place. But with the resin it got a new life in the end. Anyway, that was it, see you soon with a new project video!


Disclosure: Some of the links below are affiliate links, meaning, that at no cost to you, I get a small commission if you click through and make a purchase.

Wednesday, October 30, 2019

How to make a pair of DIY dip bars out of reclaimed wood


I really want to thank SKIL for sending me many power tools which I use every day:

Tools and materials I propose:

Making your own training equipment is really fun. I made two dip bars out of reclaimed pine and a 40mm spruce dowel.

I begun by glueing three boards together for each leg. I used another board as a spacer. I used nails to secure the pieces in place while the glue dried out. 

I then cut all the pieces to length on the table saw. A circular saw and a speed square works just as well.

I then made a quick jig so I can easily mark the dowel’s position on each leg. This also helped me to avoid measuring. I then used a 38mm spade bit to drill the hole for the dowel. To avoid tear out I drilled the hole from both ends. 

I then rounded over the bases of the legs on my belt sander. You can also use a saw and a sanding block. 

My dowel was 40mm and my largest spade bit was 38mm. So I came up with a smart set up, so I can reduce the size of the dowel’s ends on the table saw. You can also go old school and use a saw, a chisel and a file to do that job. 

At this point I sanded all the parts. I also broke the edges with my block plane. 

I added screws on the legs for extra strength. I first predrilled pilot holes and I counter sinked them.

I then glued and screwed the bases in place. 

To make sure that the legs are perpendicular to the dowel I made a spacer to help me glue the dowel straight. 

I then glued and screwed two braces close to the bases, to keep everything nice and strong. 

Finally I cut the dowels flush with a saw. I used a piece of masking tape to prevent the saw blade from damaging the wood.

My dip bars came out great. Now it’s time to do some chest exercises. But I hope you liked this one, because that was it. See you soon with a new project video.


Disclosure: Some of the links below are affiliate links, meaning, that at no cost to you, I get a small commission if you click through and make a purchase.