Sunday, April 25, 2021

How to make a tiny slingshot that fits on a pencil - Woodturning


Tools and materials I propose:

Lathe

Wood turning tools set

Chuck kit

Cordless drill

Drill press

Grinder sanding disc adapter

Sandpaper discs

Wire Burning Kit

Mineral oil


In this video I make a really small wooden slingshot out of a scrap piece of beech. It uses a rubber band and it can fit on most classic wooden pencils. 


I begun by turning my stock true with a roughing gouge.


I then flattened the front with a spindle gouge. 


To hollow the front I drilled my depth hole. Then I used the spindle gouge and I finished with a small side scrapper. 


I then used a spindle gouge and a skew to finish shaping. 


I added three burned marks using my wire burning tool. 


I divided my piece in half and drilled the holes for the rubber band. 


I parted the piece off the lathe.


I found the centre on the bottom and drilled a hole to fit a regular pencil. 


I used a disc sanding adapter from my angle grinder, to sand the excess wood.


I finished my slingshot using mineral oil. 


I added a rubber band and made some ammo out of a piece of wire. 


And my little slingshot was ready. Please don’t shoot at people or animals. I am really happy with the way it came out. But that was it, see you soon with a new project video.


Disclosure: Some of the links below are affiliate links, meaning, that at no cost to you, I get a small commission if you click through and make a purchase.

Sunday, April 18, 2021

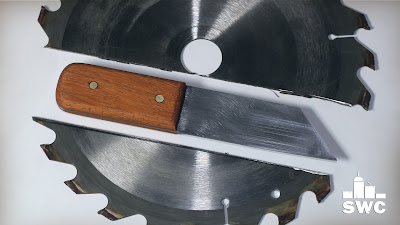
DIY knife parting tool from an old table saw blade


Tools and materials I propose:

Angle grinder

Metal cutting discs

Drill press

Flat file

Propane torch

Belt sander

hacksaw

Chisel set

Block plane

Spoke shave

Mini machinist’s lathe

Jeweler's saw


In this video I make a knife parting tool out of an old table saw blade and a piece of mahogany. This tool is used to part off thin pieces of wood when woodturning. 


I begun by cutting the blade to size with my angle grinder. The angle of the front is 45 degrees.


I then used a file to clean the burrs. 


On the drill press I drilled all the holes needed. 


You can flatten the sides with sandpaper glued on a piece of a plexiglass. But using a belt sander is much faster. You should dip the blade in water from time to time, to avoid over heating the blade. I also used a wood block to help me keep the blade at 90degrees. 


I hardened the tip of the knife. With a propane torch I heat it to red hot level and dipped it in oil to harden it. 


Then I made the handle and glued it with 5 minute epoxy. I made the brass pins on my machinist’s lathe but you can buy ready made ones. 


I shaped the handle using a chisel,  a plane, a file, a spoke shave and my belt sander.


I finished the piece with mineral oil.


It worked really nice. But that was it see you soon with a new project video. 


Disclosure: Some of the links below are affiliate links, meaning, that at no cost to you, I get a small commission if you click through and make a purchase.

Sunday, April 4, 2021

Making an extravagant wood and epoxy resin pencil


Tools and materials I propose:

Lathe

Mini machinist’s lathe

Wood turning tools set

Vacuum chamber kit

Forstner bit set

Micro mesh sanding pads

Jeweler's saw

2mm pencil refills


I wanted to see if it is possible to make a resin and wood pencil. It took much time, resources and effort to actually do it. But it worked! 


I begun by turning pieces of oak, maple, basswood and olive true. 


I then tried to split them in half using a chisel. Oak had pretty straight grain so it split really nicely. 


To make a mold, I turned a piece of spruce true. I drilled a long hole using a forstner bit. 


Then I epoxied a 2mm pencil refill in place. I then epoxied the whole piece in the mould. 


I filled the mould with epoxy and then de-gassed it in the vacuum chamber. 


I started turning the piece on the lathe to reveal the core of the mould. 


Once I was close to the core, I used the skew chisel to avoid adding too much pressure on the piece.


I then recounted the piece between centres using the graphite of the pencil as centres. I turned the piece true on the edges and then moved on the machinist’s lathe.


The machinist’s lathe is more accurate and has less vibrations. 


I dry sanded from 100 to 300. I wet sanded from 400 to 1000 grit. Then I polished using my micro mesh pads. 


You can sharpen the pencil with a regular sharpener but it’s kind of hard. So I used the belt sander instead. 


And my pencil was ready. It was a really cool experiment but that was it. See you soon with a new project video.


I would like to thank jedrek29t  because he made a similar project from which I got much inspiration. You can check it here.


Disclosure: Some of the links below are affiliate links, meaning, that at no cost to you, I get a small commission if you click through and make a purchase.