Friday, June 24, 2022

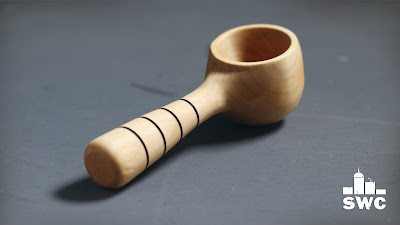
Woodturning a scoop in two axis


Tools and materials I propose:

Lathe

Wood turning tools set

Chuck kit

Tormek T8 Sharpening System

Tormek Woodturner’s Kit

Flexcut starter carving set

Caliper set

Wire Burning Kit


In this video I turn a scoop out of basswood. The technique I used Is similar to what pipe makers do to turn their blanks in two axis. 


I begun by marking all my centre points and my basic design on my blank. 


I then shaped the handle and a little bit of the scoop bowl. 


I then mounted the piece on the other axis and made a tenon for my chuck. 


Next I chucked the piece and hollowed the scoop. 


I used a cone on my chuck, reversed the piece again and cleaned the bottom. 


I shaped the rest of the scoop on my belt sander. Then I moved on to a carving knife. Finally I sanded it and finished it with mineral oil. 


It was a s mall project but really challenging. Anyway, that was it, see you soon with a new project video. 


Disclosure: Some of the links below are affiliate links, meaning, that at no cost to you, I get a small commission if you click through and make a purchase.

Friday, June 17, 2022

Woodturning a flask out of poplar and mahogany


Tools and materials I propose:

Lathe

Wood turning tools set:

Chuck kit

Tormek T8 Sharpening System

Tormek Woodturner’s Kit

Jointer planer

Table saw

Bandsaw

Forstner bit set

Drill press

Flexcut starter carving set

Caliper set

Wire Burning Kit


In this video I make a wooden flask on the lathe.


I started by squaring my stock on the jointer/planer and table saw. My stock was 8cm thick. 


Then I found all my centre points and cut the basic shape on the bandsaw. 


I then started turning between centres with the bowl gouge. I then drilled the hole on the bottle’s neck. 


To make the bottom concave I used a detail spindle gouge. 


Once I finished the hollowing process I cut off the piece from the chuck. 


To hollow the inside of my container I used a glue chuck with some epoxy. 


Then I started turning the caps out of mahogany. I used some hard wood to add a decorative burning line. 


Finally I made the cap out of mahogany again and finished the piece with mineral oil.


It was a really interesting piece that required turning in two axis. But that was it. See you soon with a new project video.


Disclosure: Some of the links below are affiliate links, meaning, that at no cost to you, I get a small commission if you click through and make a purchase.
Friday, June 10, 2022

Poplar bowl with hand carved texture - woodturning


Tools and materials I propose:

Lathe

Wood turning tools set

Chuck kit

Tormek T8 Sharpening System

Tormek Woodturner’s Kit

Jointer planer

Table saw

Bandsaw

Flexcut starter carving set

Circular saw


In this video I make a 24cm diameter bowl out of poplar wood. 


First of all I cut my blank on the bandsaw and mounted it with a face plate. My stock was 8cm thick. 


I then turned the exterior of the bowl. I also created a mortise in the bottom for my chuck.


I then reversed the bowl and started hollowing it with my bowl gouge. 


Then using a carving gouge I added texture on my bowl. 


I finished my bowl with mineral oil.


It was a simple but really fun project. But that was it, see you soon with a new project video. 


Disclosure: Some of the links below are affiliate links, meaning, that at no cost to you, I get a small commission if you click through and make a purchase.

Friday, June 3, 2022

Woodturning and carving a poplar vase


Tools and materials I propose:

Lathe

Wood turning tools set

Chuck kit

Tormek T8 Sharpening System

Tormek Woodturner’s Kit

Buffing kit

Forstner bit set

Foredom Woodcarving Kit

Jointer planer

Table saw

Bandsaw

No4 hand plane

Flexcut starter carving set

Flat rasp

Round rasp

Flat file

Round file


In this video I make a face shaped vase out of poplar wood. 


I begun by squaring my stock on the jointer planer and the table saw. 


Then I found my centre points. 


I removed as much material as I could on the bandsaw and table saw. 


I used a hand plane to clean the saw marks. 


Then I mounted the piece between centres on the lathe and turned the points I wanted. 


Then I drilled the vase hole on the lathe using a forstner bit. 


I used a cone on my chuck and flipped the piece over to make the bottom concave so it sits nicely on a flat surface. 


I then used my rotary tool to power carve the face. 


I also used files and chisels where ever I had to. 


Then I added some texture using my rotary tool. 


Finally I applied a coat of sealer and buffed it on the wheel with carnauba wax. 


And that was it. My little vase is ready. See you soon with a new project video. 


Disclosure: Some of the links below are affiliate links, meaning, that at no cost to you, I get a small commission if you click through and make a purchase.