Tuesday, October 27, 2020

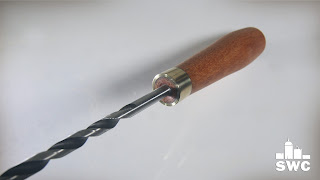
Making a hand drill for woodturners


Tools and materials I propose:

Lathe

Wood turning tools set

Chuck kit

Caliper set

Centre drill countersink bit 

Mini machinist’s lathe

Cutter Set for Metal Lathe

Type and numbers stamp kit

Jeweler's saw


In this video I make a hand drill for creating long holes in my small lathe. You can also use it to establish the depth in your bowls or boxes before hollowing.  I made it out of scrap pieces of mahogany, maple and brass. I also used a long 8mm drill bit.


First of all I glued a piece of maple with a piece of mahogany to make my blank. 


I then turned the piece true using a roughing gouge. 


Using a centre countersink bit I drilled the entry hole. This would keep the drill bit straight while I make the final hole. 


I then used my machinist’s lathe to make a brass ring for the handle. 


I then epoxied the ring in place. I secured the piece with my steady rest and then I trimmed the ring flush. 


Then I finished shaping the handle using a skew and the roughing gouge. I sanded until 400 grit and then I polished the handle with abrasive polishing paste. 


Finally I epoxied the drill bit in place. I then used a punch to add the number of the drill bit on the handle. It’s an 8mm drill bit. 


And my drill was ready. It’s actually pretty accurate and works really great. But that was it, see you soon with a new project video. 


Disclosure: Some of the links below are affiliate links, meaning, that at no cost to you, I get a small commission if you click through and make a purchase.

Monday, October 19, 2020

Making a milk can maraca - Woodturning


Tools and materials I propose:

Lathe

Wood turning tools set

Chuck kit

Wire Burning Kit

Bandsaw

Caliper set

Forstner bit set


In this video I make the percussive musical instrument called maraca. I made it out of basswood, a milk tin can and some rice. It was really fun to make, but more fun to play.


I begun by opening up one side of the can. I cleaned the can and let it aside. 


Then I cut a circle on the bandsaw, out of a piece of basswood. 


I started turning the core of the handle on the lathe. I then started turning a tenon. 


Using a forstner bit I drilled the hole on the circular piece. Then I epoxied the circle in place. I did the maraca in two pieces in order to save some wood while woodturning.


I did most of the shaping using a bowl gouge. 


At this point I made a tenon to fit the tin can. I did a series of circles to test which fitted best. Then I made the tenon with a parting tool. 


I drilled a pilot hole on the lathe. I would screw the can in place later on. I drilled the can and screwed it in place, to check everything was ok. 


I finished shaping with the bowl gouge and a round scraper. I then used a pair of dividers to create grooves for the wire burner. I also widened the grooves with my skew. 


I parted the piece off the lathe. I finished it with a few clear coats of spray paint. I sanded between coats. I filled the maraca with rice. You can experiment with different materials. You can use several kind of seeds, small rocks, nails, screws etc and choose what sounds best to you.


I was a really fun project, but that was it, see you soon with a new project video!


Disclosure: Some of the links below are affiliate links, meaning, that at no cost to you, I get a small commission if you click through and make a purchase.
Tuesday, October 13, 2020

How to make a mallet out of aluminium, epoxy resin and mulberry wood


Tools and materials I propose:

Vacuum chamber kit

Resin

Lathe

Wood turning tools set

Chuck kit

Mini machinist’s lathe

Forstner bit set

Wire Burning Kit

Centre drill countersink bit

Caliper set


I had some aluminium savings from my metal lathe. So I decided to incorporate them into an epoxy resin project. I decided to make this mallet. I think it came out pretty interesting.


First of all I placed the metal savings in a plastic cap. Then I mixed some resin and added black pigment. I poured the resin in the cap and the I de-gassed it in the vacuum chamber. 


Then I used a wood off-cut that fitted my chuck’s jaws and I epoxied the blank in place. To prevent the piece from moving around while glue up, I used a bamboo stick as a pin. 


I did most of the turning using a round nose scrapper. I then Used a centre drill countersink bit to drill the centre. Then I used drill bits and forstner bits to hollow the epoxy head of the mallet. 


I then sanded from 100 to 320 dry. I wet sanded from 400 to 1000 grit. Finally I polished the epoxy with fine and super fine abrasive paste. 


I parted the piece off the lathe.  I then used my bowl bottom chuck and reversed the piece to finish it’s other side. 


I then turned a piece of mulberry on the lathe to make a handle. I used the roughing gouge and the round scrapper. I also used a flat chisel to make the tenon. I also used the skew to make the entry points for the wire burning tool. 


I epoxied the head in place. The I cut the piece off the lathe and used the belt sander to clean the cut parts. 


I finished the mallet with a coat of mineral oil.


Aluminium savings and black epoxy resin worked really nicely together creating a really interesting material.


I am really happy with the way my mallet came out. But that was it. See you soon with a new project video.


Disclosure: Some of the links below are affiliate links, meaning, that at no cost to you, I get a small commission if you click through and make a purchase.

Tuesday, October 6, 2020

Making a revolving centre for turning spheres on the lathe


Tools and materials I propose:

Lathe

Wood turning tools set

Chuck kit

Mini machinist’s lathe

Forstner bit set


In this video I used the metal lathe to make a live centre for the woodturning lathe. To make it I used a piece of aluminium, a ball bearing, wood and leather. I made this tool for making spheres but you can make different adaptors and use it in many different situations. 


To make my live centre I took an old live centre as a reference. I didn’t have the right tools to measure the taper with accuracy so I did a couple of trials. I finally set my lathe at half a degree and it seems to work.


I made the piece out of aluminium but steel is a better option but harder to work with. 


Anyway first of all I turned the tenon to fit my ball bearing. I then reversed chucked the piece and started working on the morse taper. 


Then I epoxied the bearing in place.


Now it was time to work on the wood piece. I used a piece of olive wood I had. 


First I created the tenon for my chuck. Then I used several forstner bits to create a hole that fit my bearing. I reversed chucked the piece again and created a taper. Then I drilled a hole in front. I used my hook tool to slightly hollow the front. 


Then I used some contact cement to glue a piece of leather in front. The leather prevents the wood from being damaged as the tailstock presses on it. 


And basically my little tool was ready. Although I am not sure I got the taper right it seems to work really nicely. But that was it, see you soon with a new project video.


Disclosure: Some of the links below are affiliate links, meaning, that at no cost to you, I get a small commission if you click through and make a purchase.