Friday, May 27, 2022

Woodturning an end grain vase out of almond and apricot wood


Tools and materials I propose:

Pyrography Wood Burning Tips

Pyrography Pen Wood Burning Kit

Alcohol based markers

Lathe

Wood turning tools set

Chuck kit

Tormek T8 Sharpening System

Tormek Woodturner’s Kit

Buffing kit

Forstner bit set


In this video I make an end grain vase / box out of almond wood. The cap is made out of apricot. I also drew some decorative leaves using my wood burner. 


I begun by turning the almond between centres. I also created the tenon for my chuck. 


I then chucked the piece and shaped the exterior first. Then I used a forstner bit to establish my depth. This was end grain so I mostly used my hook tool to hollow it. 


Then using my divider, I divided the cylinder and drew my decorative leaves. 


Using a cone on my chuck, I reversed the piece to clean the bottom. 


Then I added a coat of sealer. I coloured the leaves with alcohol based markers and buffed the piece with carnauba wax. 


Then I made the cap out of apricot. Apricot tends to crack, so I used sawdust and glue to fill my cracks. I kind of liked the cracks in this piece.


And that was it. My vase was ready. It came out really nice. But that was it, see you soon with a new project video. 


Disclosure: Some of the links below are affiliate links, meaning, that at no cost to you, I get a small commission if you click through and make a purchase.

Friday, May 20, 2022

Assembling a tele style electric DIY guitar kit and wood burning the artwork


Tools and materials:

Pyrography Pen Wood Burning Kit

Alcohol based markers

Buffing Wheel Set

Cleaning & polishing rotary tool kit

Chisel set

Bandsaw

Cordless drill

Rotary tool

Belt sander

Flat rasp

Round rasp

Flat file

Round file

Spoke shave


In this video I assemble a guitar kit. I also decorated the guitar with pyrography and alcohol based coloured markers. 


Harley benton was kind enough to send me this kit. You can find it here.


First of all I scanned the headstock and designed a template based on a telecaster. 


I then cut the headstock on the bandsaw and sanded it. 


The guitar is pre-finished so I sanded the old finish and wood burned my design. Next I added a coat of sealer and then I coloured the piece. Finally I buffed it on the wheel with carnauba wax. 


The fret work of the kit was alright. But I like my frets really shinny. So I polished them with a rotary tool. This helps  when bending strings or when you like to produce vibrato effect. 


The same techniques I applied on the body of the guitar as well. 


The electronic part didn’t require soldering. So at this point I assembled all the parts together. 


I then worked a little bit on the action of the strings and the intonation of the guitar. Also I like the pickups relatively high so they are kind of loud. 


Over all it was a really interesting process and the guitar came out great. But that was it. See you soon with a new project video. 


Disclosure: Some of the links below are affiliate links, meaning, that at no cost to you, I get a small commission if you click through and make a purchase.

Friday, May 13, 2022

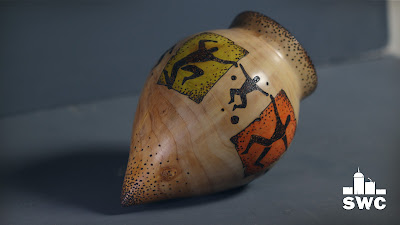
Funky amphora inspired hollow form from almond wood - Woodturning


Tools and materials I propose:

Pyrography Wood Burning Tips

Pyrography Pen Wood Burning Kit

Alcohol based markers

Lathe

Wood turning tools set

Chuck kit

Tormek T8 Sharpening System

Tormek Woodturner’s Kit

Buffing kit

Forstner bit set

Propane torch


In this video I make an amphora inspired hollow form vase out of almond wood. 


I begun by turning my stock between centres and making a tenon for my chuck. 


I then chucked the pieces and turned it’s outer form. With a forstner bit I established my depth. Then using the hook tool, I started hollowing the end grain. 


I filled the cracks with super glue and saw dust. I burned the inside black with a torch. 


I then used my dividing mechanism to divide the piece and draw my designs. I used my wood burner to burn the designs. 


I used a cone block on my chuck and then reversed the piece between centres to clean the bottom. 


I added a coat of sealer and then coloured my designs. Finally I buffed the piece with carnauba wax.


It was a really interesting project, but that was it. See you soon with a new project video. 


Disclosure: Some of the links below are affiliate links, meaning, that at no cost to you, I get a small commission if you click through and make a purchase.

Friday, May 6, 2022

Making a second wooden chair for kids - DIY


Tools and materials:

Table saw

Block plane

Cordless Impact Driver

Cordless drill

Random orbit sander

Chisel set

Jointer planer

Flush trim saw

Bandsaw

Belt sander

Tormek T8 Sharpening System

Chisel set

Dowel center pin

Trim router

Flush trim saw

Drill press

Air compressor, nail and staple gun kit


A few years ago I made a kids chair. Now I had to make a second one out of spruce. I also made a few fine tunings to the first one. 


I first made a paper template using the first chair as reference. 


I then planed and cut my wood to size. I used the table saw and the bandsaw. I then sanded the pieces to my lines. I also used a chisel to clean the pieces I couldn’t reach with the sander. 


I used dowel joinery to join the pieces together. 


While glueing the sides I wanted to make some fine tunings to the first one. I removed the screws, and removed wood with the router and chisel. I then glued new wood in place which I then sanded and planed flush. I then  painted and varnished the chair. 


Back to the new chair. I glued the sides in place. To glue the back I first planed it with the block plane until I achieved a good fit. 


Next I glued the base. Finally latex paint and water based varnish again.


And my chair was ready. It’s quite lighter coloured because it’s spruce. The old one was pine and it was really old wood.


But that was it see you soon with a new project video. 


Disclosure: Some of the links below are affiliate links, meaning, that at no cost to you, I get a small commission if you click through and make a purchase.