Friday, December 21, 2018

How to make a rustic wooden snowman with hand tools


Tools and materials I propose:


I created my snowman out of a scrap piece, I found in the garbage. I think it was part of an old door.

First of all I created a circle at one end of the stock. Then I made a smaller circle on the other end.

I used my vise and a screw clamp to secure the stock on my bench.

I wanted to create a cone, so I started shaping with my draw knife. The circles on the ends were my limits. So I tried to remove material, without losing the circles.

After the draw knife, I moved on to the plane. The plane smoothed everything out!

Next I divided the cone to my basic snowman shapes. I also divided the hemispheres of the snowman.

Next I added a piece of tape as a depth mark on my saw. 

And I created my stop cuts. I stared carving with a gouge. When I finished the first wave of carving, I decided I wanted my shapes to be more dramatic. So I made another series of stop cuts and continued to carve.

My gouge was pretty good quality, so I sharpened it only once for this project.

The next step was to use a file to clean the gouge marks. After the file I used 100grit sandpaper to clean the file marks. I did not get crazy here. I wanted the project to look beat up and hand made.

Next I used a center punch to create my drilling marks. I used my ancient hand powered drill to make my holes.

The nose of my snowman is just a 6mm dowel glued in place.

To make the hands, I used my spokeshave to round over a piece of square stock. Next I made a few stop cuts, and used a chisel to shape the gloves of the snowman.

I used the chisel again to flatten the area of the snowman that would receive the arms. The arms are connected to the body with wood glue and a 6mm dowel.

At this point I started the paint job. First I applied a coat of white latex paint. 

The paint raised the grain of the wood, so I lightly sanded with 220 grit.

Next I painted the hat and the gloves with blue. The nose was painted orange as a carrot.

To create the rustic effect I sanded the white areas with 100grit, until the grain of the wood started to show up.

On the blue and orange areas, I sanded until the white paint underneath started to show up. I also like to reveal the high spots, like the edges of the hat!

I finished the piece with two coats of clear, water based, satin varnish. 

And I was done. Some people don’t like the rustic projects, I love them. I think they have a lot of character and personality.

I am really happy with my little snowman, I hope you like him too.

But that was it, have all a Merry Christmas. See you soon, with a new project video!


Disclosure: Some of the links below are affiliate links, meaning, that at no cost to you, I get a small commission if you click through and make a purchase.

Saturday, December 15, 2018

Turning the wet mulberry bowl to it's final shape


Tools and materials I propose:

I turned this wet mulberry wood bowl two moths ago. Now I turn it to it's final shape and I hope that it won't deform too much over time. 

As you can see in the photos, the deformation was pretty dramatic. I guess I could wait a couple of more months. But I still want to see how much more it will deform!

I begun by shaping the chuck’s mortise to fit my chuck.

I started turning with the bowl gouge. But the bowl suddenly flew of the lathe. So I decided to secure it better on the lathe, using my tailstock and a scrap wood piece.

I slowly turned the piece into shape using mainly the bowl gouge. I used a flat chisel to flatten the lip. I also used a round scraper to clean the inside of the bowl. 

I sanded the bowl with a few grits of sandpaper. Then I applied my homemade beeswax and mineral oil finish and started sanding with my micro mesh pads.

Finally I buffed the bowl with my buffing wheel kit!

I hand sanded the bottom because I could not reach it with the bowl gouge.

I stopped the project here. This whole thing is an experiment, so I’ll wait and see, how much more the bowl will change over time.

But that was it! See you soon with a new woodworking project!


Disclosure: Some of the links below are affiliate links, meaning, that at no cost to you, I get a small commission if you click through and make a purchase.

Tuesday, December 11, 2018

How to solder copper pipes


Tools and materials I propose:


Many people are kind of afraid soldering copper pipes for DIY projects. But this is actually a pretty easy procedure.

Before you begin you are gonna need a few tools.

Obviously you are gonna need copper pipes and fittings. You will need solder and flux. A propane torch and a propane cylinder. A copper pipe cutter. Don’t buy the cheapest cutter, buy a descent one because most cheap ones won’t work. You will also need a piece of 100 grit sandpaper.

To cut the pipe, place the cutter in place and tighten it just a bit. Then make the first turn. Tighten a bit more and make another full circle. Repeat that process until you gently cut all the way through.

Then sand the touching surfaces you want to solder. This way you clean the joints. Next add the flux and then the fitting.

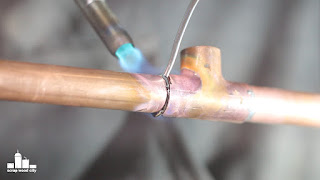
Assemble the torch. Open the valve a little and light the torch. Then increase the propane flow.

Start heating the joint evenly. When the temperature is high enough, the solder will follow the heat and the flux. Then take a wet rag and clean the joint. This also cools the joint faster.

When possible, add the solder from the top. Let gravity do the rest. 

You don’t have to turn the pipe around, the solder will follow the heat. As you gain experience you will add just the tiny bit of solder you need.

Wasn’t that easy? 

Just a few tools and you are good to go. 

I hope you found this tutorial useful!

See you soon with a new project video!

Disclosure: Some of the links below are affiliate links, meaning, that at no cost to you, I get a small commission if you click through and make a purchase.

Friday, December 7, 2018

How to make a different wooden nutcracker for Christmas


I made this nutcracker out of oak and eucalyptus wood. I think it's threaded screw mechanism and the fun character make it a unique Christmas present from a woodworker to friends and relatives.

Table saw Bandsaw Disclosure: Some of the links below are affiliate links, meaning, that at no cost to you, I get a small commission if you click through and make a purchase.

The whole mechanism is just a screw that acts as a press against the nuts. To make the male screw I used pine, oak and eucalyptus. The wood that worked the best was eucalyptus. It is really hard and dense wood.

First of all I turned the piece true on the lathe. Then I flattened it with a straight chisel and a sanding block. I then added mineral oil as lubricant, and cut the male threads using my wood threading kit.

Next I planed a piece of oak on my jointer. I then cut it in half on the bandsaw and glued the two pieces together.

While the glue dried I started working on my character. I first made a tenon to fit on my chuck with my skew chisel. I then mounted the piece on the chuck. I established my measurements with the parting tool and did most of the shaping with the spindle gouge. I also used the skew in a few tight spots.

I drilled the bottom with a forstner bit. I gradually increased the size of the bit until I reached the diameter I wanted. I did all the drilling on the lathe.

Then I lubricated the hole and used my taps to start threading. The female threads are easier to make because my kit has two taps and completes the threading in two passes. 

I then glued the threaded dowel in the female hole.

I painted my character with latex paints. It is easy to find, doesn’t smell and dries really fast.

To speed up the drying process I used my heat gun.

I then parted the piece off the lathe, sanded it an painted the top.

I finished it with three coats of clear glossy varnish.

Then I squared the glued stock on the jointer and cut it to size on the tablesaw. I completed the cut in several passes to make things easier for my table saw.

Then I found the centers for the lathe.

I used a 38mm spade bit to drill the hole for the nuts. I drilled half way in. Then I used a regular drill bit to drill all the way through. Then I flipped the piece over and finished the drilling with the spade bit. This way I had a much cleaner cut.

Again on the table saw I removed as much material as I could, to save me some time on the lathe.

Finally I started shaping the base on the lathe. I mostly used my bowl gouge here.

Using the same process as before I created again the female threads.

I applied the varnish and my little nutcracker was ready.

I think it came out really nice. 


Have all a merry Christmas! See you soon with a new project video!

Thursday, November 29, 2018

Making a wooden box with threaded lid for my frankincense


Tools and materials I propose: Wood threading kit
Lathe Wood turning tools set
Forstner bit set
No4 hand plane
Woodworking vise
Jointer planer
Table saw
Bandsaw


I made this piece out of a piece of apricot wood. 

First of all I split the wood in smaller pieces with an axe.

Next I cut the edges straight, with a handsaw.

I then mounted the piece between centers on the lathe and turned it true with my roughing gouge.

With a skew chisel I created a tenon that fitted my chuck.

I filled a few cracks on the wood with super glue.

To cut my threads I used a threading kit that can create both male and female threads.

First I had to reduce the thickness of my stock to fit the male threading tool.

I used the parting tool to establish my goal and then used a flat chisel to remove material fast.

Then I started cutting the male threads.

At this point I started hollowing the box with forstner bits. This was end grain drilling, so I took it really slow. I gradually increased the sizes of the bits until I reached the diameter I wanted.

Next I finished shaping the body of the box and moved on to the lid. 

I started hollowing again!

Before using the threading tools it is nice to add oil. The oil helps the thread chasing process.

Then I begun cutting with the tap. My kit has two taps. One that makes a roughing pass and one that finishes off the process.

And it worked nicely!

At this point I cut the lid of the lathe with a handsaw.

I then screwed the lid on the box and started turning the lid with the spindle gouge.

Next I split anotherr piece to make a cross.

I roughly planed the piece with a hand plane to make things easier on the jointer. Next I used my jointer/planer to square my stock. I cleaned the rest of the edges on my table saw.

I then  made my half lap joints on the bandsaw and glued the cross pieces together.

Next I sanded the cross.

I then drilled a hole on the cap. This hole would receive a dowel connected to the cross.

Next I painted the cap black with latex paint. I applied two coats while sanding between coats.

At this point I parted the box off the lathe. I used the parting tool at a slight angle to make the box sit nicely on flat surfaces. The tool left a small tenon, which I cut off with a carving gouge.

Next I drilled the hole on the cross and glued the dowel, the cross and the cap.

I finished my box with my home made beeswax and mineral oil finish.

I made this box for two reasons. First I want to try out my new treading kit. The second reason was to make a nice box to store my frankincense.

I am really happy with the way it came out, I hope you enjoyed this build too!

:)


Disclosure: Some of the links below are affiliate links, meaning, that at no cost to you, I get a small commission if you click through and make a purchase.

Monday, November 12, 2018

Pyrography art tutorial with my new wood burner


My old wood burner was just a soldering iron on which you could change the tips. It was really cheap and it worked. Since I really enjoy wood burning, I decided to invest in a better quality tool.

I got a pyrography station with variable heat. It gets really hot almost instantly. It also uses more sophisticated tips.

I gave it a try on a piece of birch plywood. Before I begun burning, I lightly sanded with 220grit.

Then I set the burner at an average heat and started creating the outlines of my design. This was actually a free hand improvisation!

Then I increased the heat and started filling the darkest parts of my picture. I did that to have a reference point between my darkest spots and also the more bright ones.

I switched back to average heat and started filling the sky with circular motions. 

Next I started shading my design slowly. Taking my time here helped me avoid mistakes.

To shade my design, I had an imaginary light source in my mind. Then it was a matter of light and shadow. Shadows next to lights made the forms I wanted pop up. 

Also the more you insist on an area with the wood burner the darker it gets.

You can work on these art pieces as much as you want. At the point I felt happy with my design I stopped.

It was a really enjoyable project and my new pyrographer performed really nicely! 

See you soon with a new woodworking project!


Disclosure: Some of the links below are affiliate links, meaning, that at no cost to you, I get a small commission if you click through and make a purchase.

Thursday, November 8, 2018

How to install a woodworking bench vise


I just got a proper carpentry vise. In this video I document it’s installation process.  

I got inspired from Mr. Paul Sellers, check out his vise installation video here.

Tools and materials I propose:

First of all I had to fill the front area of my work bench with wood. I did that by glueing and screwing pieces of plywood in place.

Next I marked the screw holes of the back jaw, predrilled pilot holes and added the screws.

Under the bench top I glued and screwed another wooden block. On that I predrilled pilots holes again and added bolts and washers to secure the vise in place.

I next I cut a piece of plywood on the bandsaw to act as the jaw’s frame. I glued and nailed it in place with my air powered nail gun.

I then cut the plywood jaws on the table saw. I used masking tape to make a cleaner cut in the areas were the blade was perpendicular to the grain of the wood.

Next I clamped the two jaws on the vise to get the marks from the back jaw’s bolts. I used a forstner bit to create pockets to hide them.

Then I glued the back jaw in place and screwed the front one. 

I then used a hand plane to make everything flush. 

To make the sides flush I used my belt sander.

Next I cut a piece of leather for the front jaw. I applied adhesive to both the contacting surfaces. I waited about 15 minutes and glued the pieces together. I then trimmed the leather flush with a knife.

At this point I installed the jaw and used the vise as clamp to hold the pieces together over night.

I did some tests and my vise worked really nicely.

This is a huge upgrade for my workshop and it was about time it happened!

I hope you enjoyed this project, as much as I did!


Disclosure: Some of the links below are affiliate links, meaning, that at no cost to you, I get a small commission if you click through and make a purchase.