Friday, November 27, 2015

How to make a rustic pallet Christmas tree


I had some pallet wood laying around, and I decided to make a Christmas tree.

First of all I roughly sanded my pallet boards with my orbital sander, using 50 grit sandpaper.

I then cut off the edges of my tree’s main branch, using my cross cut sled, on my table saw. You can also do that with a regular saw and a jitter box.

I glued and screwed my center piece of the rest of the tree. I first pre drilled some pilot holes, before screwing my piece.

I added thee screws which I connected with string, in order to have the basic triangle, of my piece’s shape. I used a chalk to trace around that triangle, my tree’s shape.

I cut out the shape of my tree with my jigsaw.

I then cut the pieces of the tree’s base using my cross cut sled, on the table saw.

I glued and screwed them together.

I marked the positions of the screws of the base and drilled the holes. I also counter sinked them to the bottom of my base.

I clamped the tree on my vise upside down, used the screws of the bottom as marking pins and predrilled the holes on the tree. 

I didn’t glue the base to the body, because I wanted to be able to take the tree apart for storage. 

I finally screwed the bottom and the main body of the tree together.

I sanded again the piece and applied three coats of clear water based satin varnish with light sanding between coats.

I wanted to add Christmas lights to the back of my tree, in order to create a back light effect.

I added screws on the back and mounted the lights on the screws, using zip ties.

My tree is ready.

Merry Christmas to all!

Saturday, November 21, 2015

How to make a case for your air pistol


The pistol came with a foam base. I used that as a mold for my box. 

First of all I cut the sides of the box to size, out of 8mm birch plywood, on my table saw.

I then set my table saw blade to 45 degrees and started cutting the side miters on my cross cut sled.

I glued the carcass of the box using wood glue and my picture frame clamp.

For the bottom and the top of the box I used 4mm plywood, which I roughly cut on my table saw.

I glued all the pieces together. 

I trimmed the caps flush with my router, using a flush trim bit. I used my router upside down as router table.

I cut the box in two pieces on my table saw. Before the last cut, I added a wooden shim on the upper side. The shim’s width matches the width of my saw blade. I did that to prevent the top of the box from moving while I made the last cut.

My CNC machine did a good job, on carving a decorative design on the top of my box.

I applied 4 coats of clear, water based varnish on my box, while lightly sanding between coats.

I added legs on the bottom of my case.

I added the hinges using screws. I also made pilot holes with my rotary tool, before adding the screws.

I used longer screws than I needed. So I trimmed the screws flush, using my rotary tool and a grinding disc.

My case was now ready. I added the foam base, the pistol and it’s accessories.

I hope you like it.

Monday, November 16, 2015

Experimental, DIY, floor lamp from a log


I had a sour orange tree log laying around and I decided to make a floor lamp with it.

I begun by cutting some extra branches with a hand saw. I then Trimmed a few parts of the log with an axe.

I removed the bark of the log with a sharp chisel and a mallet. 

The log was two old and had a few worms in it.

I wanted the cord of the lamp to go through the log. In order to to that I had to split the log in half.

I made a starting point with a hand saw. I then used wedges two split the log. I also used my axe as a hammer.

When the log was split, I used my router with a straight bit, to create a groove for the lamp’s wire.

I used a big carving gouge to clean up the groove a little bit.

I glued the log back together using clamps and glue. 

The hand saw created a gap. To fill that, I cut a few splines on my table saw. I fine tuned the splines with a chisel and glued them in place. I flush trimmed them using my flush trim saw.

I used my chisel to round over a few edges and carved out some worm marks. 

I used wood filler to fill the remaining gaps on the log.

I trimmed the legs with my circular saw and a hand saw.

I used a sanding disc on my angle grinder and sanded the log. I finished sanding with regular 120 grit sandpaper.

I marked the area for my lamp on the end grain of the log. I used my router to open up the hole.

I applied a coat of wood preservative to kill any remaining worms.

I then applied three coats of walnut wood stain while sanding between coats.

To create the lamp’s hat, I used a balloon as a mold. I mixed wood glue and water in a container and dipped a twine ball in it. I wrapped the twine around the balloon and when the glue was dry I had my hat. I was also careful not to cover the holes on the two ends of the balloon. This way I can add the lamp’s base and a light bulb when I have to.

For the electrical parts, I used wire, a socket with an on off switch and a light bulb base with two collars. I assembled everything with a screw driver. I have also soldered the wire with the on off switch end cable.

I glued the lamp’s hat with the log base with hot glue.

I really enjoyed this build. I learned many thing making that lamp. I will probably fine tune a few things on it in the future.

Friday, November 6, 2015

How to make a DIY serving tray with the cnc


I needed a serving tray and I decided to make one out of plywood using my cnc machine.

First of all I designed my tray in illustrator. I wanted the side pieces to be joined with finger joints. The bottom would slide in place through grooves.

After the design process was over, I imported my paths into easel, my cnc’s software.

The machine cut out all the side pieces out of 8mm plywood. The cmc leaves tabs behind. To clean those up I found that the best way, is using my 2/8 carving gauge. 

I then cut out the bottom piece on my table saw. I used my cross cut sled for the cross cut.

I wanted the bottom to be painted with a fluo green color. I masked the area I didn’t want to get painted, with paper tape. I wanted a simple triangle that comes from the diagonal of the bottom. I spray painted the piece, with a few light coats.

I sanded everything with 240 grit sandpaper.

I glued everything together with wood glue and my picture frame clamp.

To fill the gaps on some of my joints, I filled a syringe with wood glue. I applied the glue to the gap, wipe off the excess glue and sand over to fill the gap with wood dust.

My tray is ready. I think it is pretty strong, light weight and good looking! I hope you like it too!

Friday, October 30, 2015

How to make a DIY pixel art picture frame


I had a few scrap spruce pieces laying around and I decided to make a picture frame with wooden pixel art inside. I also used a piece of MDF and a piece of plexiglass.

First of all I create one be one strips of spruce with my table saw. Then using a stop block on my cross cut sled I made the little cubes that would be the pixels for my pixel artwork.

I created my artwork on illustrator, based on a canvas I created measuring my wooden cubes. The artwork was based on a classic retro arcade game “space invaders”. I transferred the canvas on the MDF, using my compass and my 90 degree square. On that canvas I glued my “pixels” using my hot glue gun.

Now it was time to make the picture frame. The frame and the plexiglass would sit on two grooves on the frame. I created those grooves on the table saw. I made several passes in order for the plexi and MDF to fit loosely in the grooves.

I cut my plexiglass and MDF to size on the table saw.

I set my table saw blade to 45 degrees and made my miters on my cross cut sled.

I assembled everything and glued the frame together. I clamped it using my picture frame clamp.

I sanded the piece and rounded over the edges with my hand plane.

I made a hole on the back of the frame to hang it on the wall. I made it on the drill press.

My picture frame was now ready!


Thursday, October 22, 2015

DIY creative rolling cabinet


I needed extra storing space for my home and I decided to make a wooden rolling cabinet.

First of all I cut my stock using my table saw and my circular saw. For cross cuts on my table saw I used my cross cut sled and a stop block. I used spruce wood for this project.

I wanted my cabinet to have moving shelfs. In order to make holes for the holders I made a drilling jig from a scrap wood piece. I clamped the jig to make my holes. When the jig was out of holes, repositioned it using dowels  to keep it in place.

I then clamped the carcass of the cabinet with my frame clamp to keep it square. I joined all the carcass pieces with metal right angles. I predrilled the holes and screwed them in place. I often checked that everything was square.

The back of the cabinet is supported with wooden pieces that are screwed in place.

I added casters to be able to move the cabinet easily. I screwed them in place.

The back wooden pieces are a wooden city. I marked them with a pencil. I used a clamped wooden piece as straight edge and used my jigsaw to make the cuts. For the windows of my buildings, I drilled a hole to insert the blade of my jigsaw and cut them out too.

I added the cabinet doors using adjustable European hinges. I marked their positions on the doors and used a 35mm forstner bit to drill the holes for them. I screwed the hinges and the doors in place. Those hinges are adjustable so you can adjust the doors to look straight.

I added the shelfs and the shelf holders.

I sanded everything with 120 grit sand paper at the beginning and then moved on to 240. To remove all the dust I used my vacuum.


My cabinet was now ready!

Wednesday, October 14, 2015

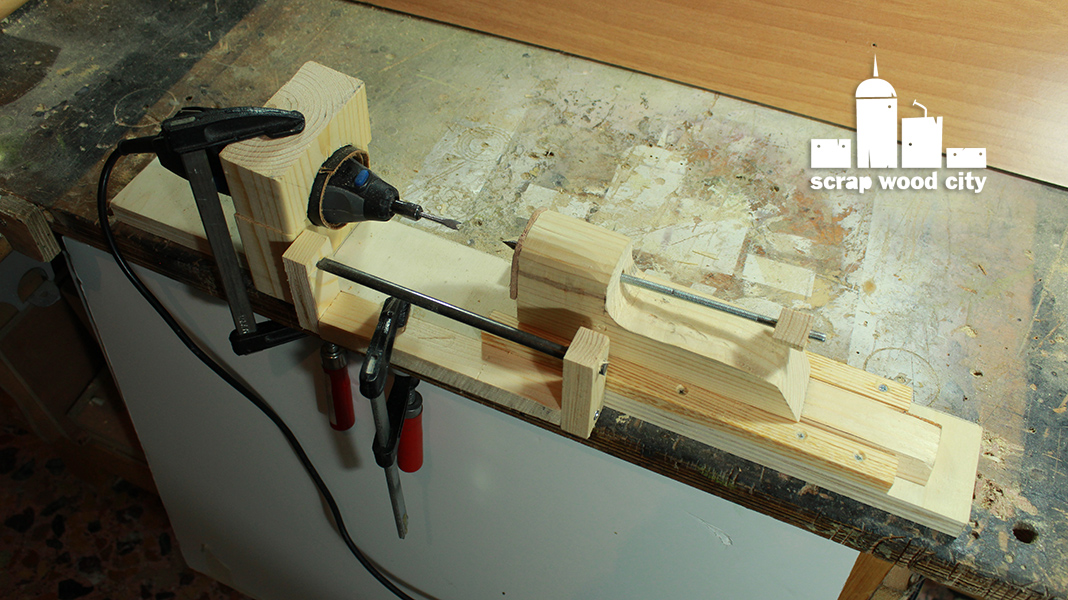
How to convert your rotary tool into a DIY mini lathe for modelism


I made this mini lathe using my rotary tool and some scrap wood and metal pieces. It is made for manufacturing small items for modelism purposes.

First of all I cut a piece of 2x4 in two pieces. Those will hold the rotary tool. I used a hand saw and a miter box. I measured my tool with my caliper and drew a circle in the point I want my tool to be. I cut the circle with a coping saw. You can use a jigsaw or a bandsaw if you have one.

To clean the hole from the saw marks, I made a custom sanding block. Using a hand plane I rounded the bottom and glued a piece of sandpaper using two sided tape.

To secure the rotary tool I added a strip of leather between the tool and the holder. The whole thing is secured with a clamp on my bench.

The tool holder is secured on a plywood base. I made a mortise using a saw and a chisel and screwed the piece on the base. To add the screws, I first drilled a couple of pilot holes and I counter sinked them.

The tailstock of the lathe will slide on the base with a type of dovetail mechanism.  To make the female dovetail i used my block plane on a small spruce piece. I secured the female dovetails on the base, using screws.

Using my caliper I measured the inner space of the rails and made the male dovetail part using again my hand plane at an angle. I also planed it flush with the female dovetails.

I used the sanding block I made earlier to make the rest of the tailstock. I cut the piece using my jigsaw. I secured the piece with the male dovetail using screws.

I used the rotary tool to mind the exact spot I needed the quill to be. I drilled the rest of the hole with a drill  and hammered a t-nut in. On top of it I added a piece of plywood secured with screws.

To make the quill, I mounted a long threaded rod on my drill and grinded the edge on my grinder.

I made a tool rest using a metal rod and a few scrap wood pieces screwed together.

Back to the quill, I made a handle using a small wood piece. I drilled the the rod and wood on my drill press and added a long nail to secure everything in place. I trimmed the nail flush with a hack saw.

I needed a small chuck to hold the pieces on the lathe and to be able to fit on the chuck of the rotary tool. I used an M6 screw and with my drill and the grinder I trimmed it to fit on the rotary’s tool chuck.  I dipped the piece in water often to avoid metal burning. I cut the bit to size with a hacksaw. For the tip of the bit I grinded on the grinder holding it with a plier. I also used my rotary tool with a grinding disk to grind a V on the edge of the bit. This way I can hammer the wood stock in before the lathe is on.

My lathe was now ready. I assembled it, added an oak dowel on the chuck, secured the quill in place and everything else with clamps. 
I made a test using my skew chisel. It is nice that my rotary tool has variable speed choices. It is very useful on the lathe.


I hope you’ll like my mini lathe project, I think it is ideal for people who practise modelism.


------------------------------------------------------------------

I have made another mini lathe in the past, find it here.

Many people before made similar DIY lathes. Here are a few of them that inspired me: