Showing posts with label jigs. Show all posts

Monday, January 11, 2021

Simple DIY sphere making tool for the wood lathe - metalworking


Tools and materials I propose:

Stick welder

Drill press

Cobalt Drill Bit Set 

Tap and die set

Bench Grinder

Angle grinder

Metal cutting discs

Lathe

Wood turning tools set

Foredom Woodcarving Kit

Carbide Burr Set


In this project I used various scrap metal parts I had in the shop to make a simple jig for making spheres on the lathe. I have made a similar jig out of wood in the past. But by using metal I was able to make the tool more simple, more efficient and less bulky.


I begun by making the base. I cut the pieces with the angle grinder and welded them in place. I then drilled the hole on my drill press and cut some threads to keep the piece in place. But I made a mistake here and I had to cut the piece in half. 


For the arm I used a couple of corner pieces as support. I also welded nuts in place so I could use their threads. 


To make the cutting edge, I used the steel from a cheap old turning tool. I grinded the bevels on the grinder. My grinder is really fast so I dipped the tool in water pretty often to cool it down. 


I then grinded a pocket and welded the cutter in place. 


After doing some tests, I decided to weld the nut from the pivot point. And I also added a large nail under the cutting edge as support. I wanted this to be removable so I could sharpen the tip easier on the grinder. 


I then used my carbide burrs on the rotary tool to clean my welds a little bit. A wire brush bit is also useful to clean up before painting.


I then added a coat of primer and then spray painted orange.


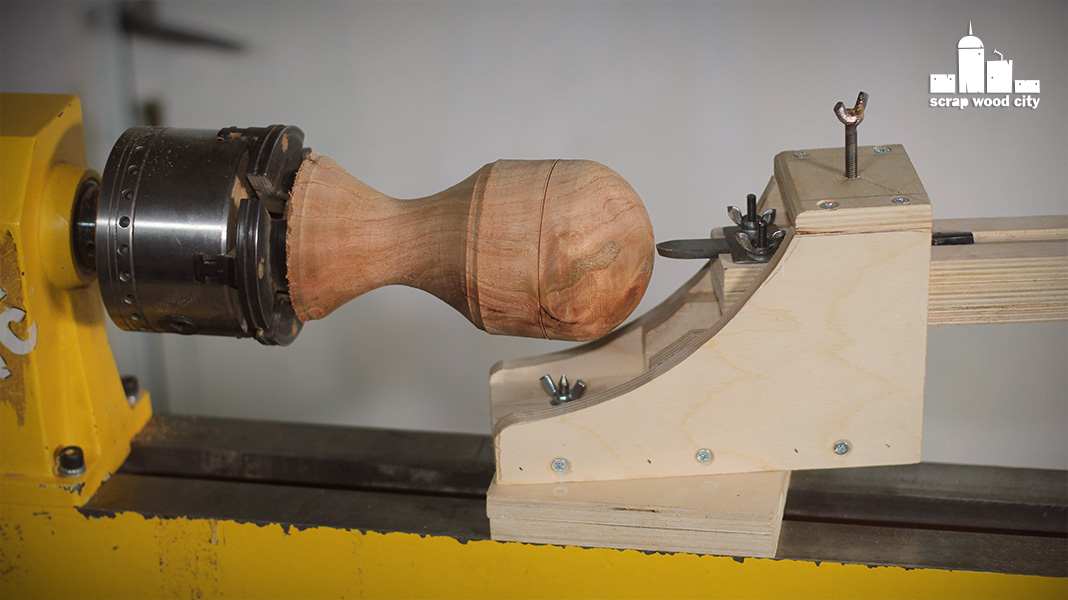
Before you use the tool you have to set it up a little bit. The cutter should be at the same height of the centre of the lathe. And the pivot point should be under the centre of your sphere. 


And my sphere making jig was ready to go. But that was it, see you soon with a new project video.


Disclosure: Some of the links below are affiliate links, meaning, that at no cost to you, I get a small commission if you click through and make a purchase.

Friday, May 31, 2019

How to make a simple cross cut sled for your table saw - DIY


Tools and materials I propose:


I just got a new table saw and I had to make a new cross cut sled. To me this the first thing one must make with the a table saw. It is really useful in so many woodworking projects.

First of all I made the rails using pine. I kept moving the fence slightly until the wood fit nicely in my table saw’s grooves. I then made the two rails.

Next I used washers as spacers. I placed them inside the grooves of the table saw. Then I added the rails. Now the rails were just above the surface of the saw. 

I glued the rails with the sled’s base and added a few nails to keep things in place. Then I secured the rails with screws. I first predrilled pilot holes and then I counter sinked them. I trimmed the rails flush with a flush trim saw. 

The base of my sled is made out of 12mm plywood. The top pieces were made out of 25mm plywood.

I cut the top pieces to size. Then I did the first cut on the sled. This gave me a reference line. I then glued the back piece perpendicular to that line. It is important that this was exactly 90 degrees. Otherwise the sled won’t be accurate.

I then screwed the top pieces in place. The front piece doesn’t need to be accurate, it’s there just for support. 

At this point I used the sled itself to cut a small piece. This small piece will help me keep my thumb out of the blade’s way. I glued and nailed it in place.

I then cut a pine piece and glued it on top of the front piece. I then rounded over it’s edges with a hand plane and a chisel. This makes it nicer to the touch.

To make the sled run smoother, I finished the bottom with three coats of clear water based varnish. I applied three coats in total while lightly sanding between coats. I also used the heat gun to speed up the drying process between coats. 

Lastly I lubricated the rails with my homemade beeswax and mineral oil finish. 

My sled came out great and it is really useful.

I hope you liked this one, because that was it. See you soon with a new project video. 


Disclosure: Some of the links below are affiliate links, meaning, that at no cost to you, I get a small commission if you click through and make a purchase.

Wednesday, April 3, 2019

How to make a DIY sphere making jig for the lathe


Tools and materials I propose:

This is a simple ball making jig for your lathe. I used 9mm plywood, 6mm threaded rod, washers, nuts and an old woodturning scraper to make it. 

First of all I made a prototype. Knowing that the basic idea worked, it was time to make the final version of the jig. 

I begun by cutting all the parts for the base on the table saw. 

I used the live center of the lathe to align the jig with the center of the lathe. 

Then I glued and nailed the pieces of the base together. 

I cut the curved sides on the bandsaw. I used the first cut piece as a template for the other one. 

I glued and nailed the sides in place but I also reinforced them with screws. 

To make the cutter I used an old, cheap woodturning scraper.

I roughly shaped it with the grinder. Water helped me keep the tool cool. Then I tilted my grinding wheel’s tool rest a by few degrees and sharpened the edge of the cutter.

I made a groove on the table saw to keep the cutter in place. I added some material on the bottom of the cutting mechanism so the cutting edge was just under the center of the lathe.

A piece of steel and a couple of threaded rods with nuts and bolts keep the cutter in place. 

To make a knob for the top I silver soldered a butterfly nut on a 6mm threaded rod. 

At this point the jig was ready for a test. First I prepare the stock so the jig can reach as far as possible. Then I tried it out. I did shallow passes instead of deep fast cuts.

It worked nicely. I hope you’ll find my ball making jig useful!

See you soon with a new project video! 


Disclosure: Some of the links below are affiliate links, meaning, that at no cost to you, I get a small commission if you click through and make a purchase.

Friday, October 19, 2018

DIY tool rest for sharpening with the vertical belt sander


I have a grinder / belt sander combo machine. I use this machine, mostly for sharpening. I already have made a tool rest for the grinder and It was time to make a tool rest for the belt sander.

The main reason for this is that the grinder creates a hollow grind. That’s because the bevel of the tool takes the curved shape of the wheel. And also as the wheel becomes smaller over time, the curve becomes even more dramatic.

On the other hand flat grind creates a flat bevel and that’s a better option in my opinion. 

First of all I removed the side fence of the tool. I am gonna use the already existing holes of the tool to add my rest.

Then I used my angle grinder to cut ti pieces of steel to size. 

Then I clamped them on the vise and shaped them together, using files.

Next I moved on the drill press, were I drilled the holes. I used oil to cool down the bit.

I then decided to connect the metal pieces with two metal corners. I remove the excess material from one corner using my hacksaw.

I connected the sides with the corners using nuts and bolts.

I soldered the steel pieces on the machine, using silver solder.

First of all I cleaned the two pieces using my rotary tool.

I then added the flux. I used my propane torch to heat both pieces and then added the silver solder.

To make the plateau I used my table saw and a cross cut sled. You may need to adjust the plateau to our needs. I want to use the belt sander to sharpen my woodturning tools, so I need the extra mass.

The plateau was not that straight, so I added a popsicle stick as him. I then marked the hole positions, drilled pilot holes and screwed the plateau in place.

I then tested my tool rest by sharpening my woodturning scraper. I first tilted the tool rest to match the bevel of my tool.

I then marked the bevel with a marker, so I know how much material I remove.

The whole thing worked and my scraper cuts like butter.

I think it will come out really handy my shop!


Disclosure: Some of the links below are affiliate links, meaning, that at no cost to you, I get a small commission if you click through and make a purchase.

Thursday, November 30, 2017

How to make a DIY belt sander benchtop station, plus a few jigs


This is a useful sanding station based on my portable belt sander. I also made jigs for chisel and gouge sharpening plus a special jig for making circles. I made this station out of birch plywood, melamine, spruce, dowels and basically whatever scrap pieces of wood I had laying around.

My Skil belt sander has those screw holes that happen to be 8mm size. So I used those and 8mm dowels to easily mount the sander on a melamine piece.

To transfer the exact location of the holes on the melamine, I used masking tape to trace a template and then transferred it on a piece of melamine I cut on the table saw. I then drilled holes on the melamine and glued the dowels in place. 

I then used my circular saw and a guide rail to cut a piece of birch plywood. I secured the melamine on the plywood using just screws. 

I then cut a couple of spruce pieces on the table saw. I glued them on the plywood. I used a few brad nails to secure them in place while glue up.

I then traced the belt sander’s sole and cut it out of a piece of spruce on the bandsaw. Now I used the sander for the first time to sand the piece. 

I then glued and nailed the sanding base on the structure. 

At this point you can clamp the jig on the bench and use it as a regular desktop sander. 

Using a scrap piece of spruce, I made a flat chisel sharpening jig. I glued a flat piece on the jig which pivots on a dowel. 

Then I made something similar for sharpening gouges. Only this time the gouge sit on a 90 degree angle so it can be rotated while sharpening!

Then I made a circle making jig. This is a flat plywood piece that is like an extruded dovetail pin. I made it on the table saw. That piece has a dowel that acts as the circle’s center. The piece slides through another piece with opposite 45 degree beveled sides. The whole piece is actually a sliding dovetail that sits on the sanding station with two dowels. A small screw secures the inner piece in place when you decide the radius of the circle you wanna make.

My jig was now ready and I hope you enjoy it! I think it will prove really useful in my shop!

Thursday, May 11, 2017

How to convert your lathe into a DIY drum sander


A thickness sander is a really useful tool. The lathe can be easily converted into one.

I made this jig using a sheet of MDF and scrap pine pieces from an old bed. I found both of them in the garbage.

First of all I cut the MDF pieces to size, using a circular saw and my guide rail.

I then measured the gap on my lathe’s base with a caliper. I transferred  that measurement between the fence of the table saw and the blade. I cut a strip of MDF that fits snugly in my lathe’s base.

I then glued and screwed the strip in place.

I cut a piano hinge to size, with my angle grinder. I then attached the piano hinge in place with screws.

Using my cross cut sled and a stop block, I cut a few pieces of MDF to size.

In one of these pieces I traced the shape of a nut. I drilled an entry hole on the drill press and cut out the shape on the scroll saw. I then finished shaping the hole with a small file. I applied a bit of two part fast setting epoxy and hammered the nut in place.

To make a knob I glued two pieces of MDF together.

I drew two circles on a scrap metal piece and rough cut them out with the angle grinder. I then drilled a hole in their middle on my drill press. I used some WD40 to prevent my drill bit from overheating. I shaped the circles on my bench grinder. Using a file I removed any burrs.

Using the angle grinder I cut a piece of threaded rod. I created a bevel on the cut edge, using again the angle grinder. This helps the rod to be easily screwed in the female nut.

I then drilled some holes and added the threaded rods, the metal circles, washers and wing nuts in place.

I glued and screwed in place the piece with the glued nut.

To make the knob, I drew a circle, divided it in 6 and then drew  three circles with equal distances between them. I cut the shape of the knob on the bandsaw. I finished shaping it with a cylindrical file and sandpaper. I screwed a threaded rod in the center of the knob. I drilled a hole on the drill press and added a nail to act as a locking key. I secured the nail in place, with a drop of super glue.

Now to make the sanding drum, I used a chisel to detach the cylindrical piece of the bed. I cut it to size using the table saw and a cross cut sled.

With my center finder, I marked the centers on each end of the cylinder and used an owl to mark the center.

I mounted the cylinder on the lathe between centers and created a tenon to fit my chuck.

I remounted the piece on my chuck. I used a straight chisel to even out the cylinder. I sanded at 100grit.

I cut a thin strip of sandpaper and attached it on the cylinder with zip ties. 

My homemade thickness ( drum ) sander was now ready, and works really nicely!

Important note: If you make a similar build, don’t forget that you have to feed the material from the opposite side of the lathe. If you feed it the other way, the drum tends to catch the material and through it out!