Monday, December 28, 2020

Make a simple DIY, spindle locking mechanism, for your cheap woodturning lathe


Tools and materials I propose:

Stick welder

Lathe

Mini machinist’s lathe

Tap and die set

Drill press

Angle grinder

Foredom Woodcarving Kit

Flexcut starter carving set


In this video I make a simple mechanism to keep the spindle of my cheap lathe locked in place. You need to lock your spindle sometimes so you can carve or do other tasks on your project, while it is still mounted on the lathe. My mechanism also works with a chuck I have, which has a built in divider on it. 


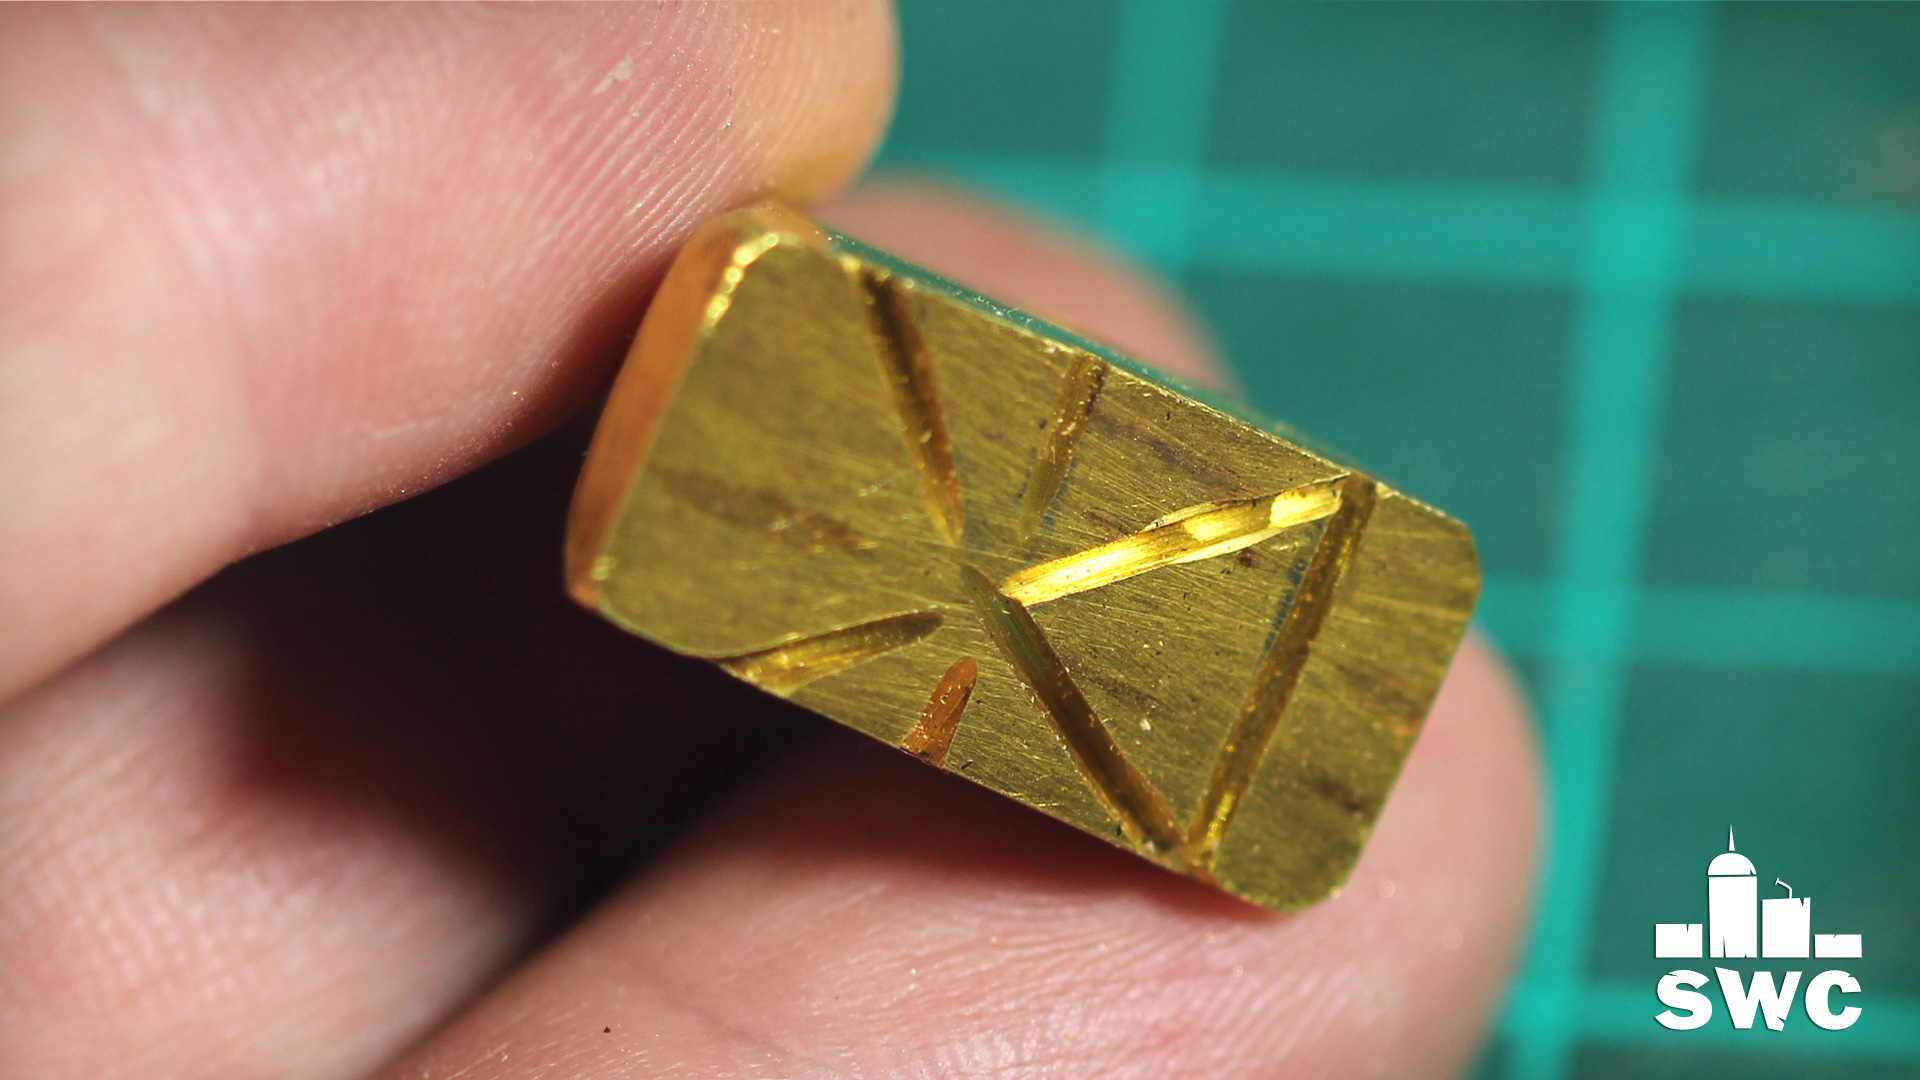
I wanted the mechanism to fit into the holes of my divider. So I mounted a piece of threaded rod on my machinist’s lathe, and shaped the tip to fit. If you don’t have a machinist’s lathe you can shape the tip on your grinder.


I then made all the necessary holes on the drill press. I threaded one hole just to keep the rod in place. 


I then cut the base to size with my angle grinder. 


To keep the nut in place for welding I added another nut from the back. 


Then I used my stick welder to weld everything in place. Those were pretty small pieces so I used the thinnest electrodes I could find. I also tack welded everything.


I cleaned the welds with a wire brush on my rotary tool.


Finally I coated the base with primer and finished it with green spray paint. I wanted this to stand out on the lathe to avoid any accidents. So I used a really bright color. 


And my little gadget was ready. It works great and I like the fact that I avoided drilling onto the cast iron parts of my lathe. I made it, to use it mostly in combination with my built in divider of my chuck.


I hope you found this project useful, because that was it.


See you soon with a new project video!


Disclosure: Some of the links below are affiliate links, meaning, that at no cost to you, I get a small commission if you click through and make a purchase.

Monday, December 21, 2020

How to make a simple DIY branding iron


Tools and materials I propose:

Foredom Woodcarving Kit

Heat shrinking tube

Tap and die set

Cleaning & polishing rotary tool kit

Cordless drill 

Miter box

Hand saw


In this video I convert a broken soldering iron to a branding iron. I tried to make it as simple as possible using tools most people already have. 


First of all I removed the broken parts of the tool an I added some heat shrinking tube to protect the wiring a little bit more. 


I then cleaned the metal parts. I used sand paper and my rotary tool with a buffing wheel for this job. 


I then threaded the tip of the soldering iron and a piece of brass. I used an M4 tap and die set for this job. 


Using the rotary tool with a cutting disc and a file I shaped the stamp piece. 


To make a handle I cut a piece of wood from an old hammer handle. I used my miter box and a hand saw for the job. 


I used my drill to drill the hole for the wires.I drilled a larger hole in front for the soldering iron. I shaped it on the belt sander and finished it with mineral oil. 


I then used my rotary tool to carve the stamp. The stamp’s design must be reversed in order to print properly. I used a cutting disc to carve my design, but you can use a small spherical bit to carve more complicated designs. 


And basically my branding iron was ready. If you use an under 30Watts tool you can boost the temperature a little bit with a propane torch.


I hope you found my little video useful. But that was it. See you soon with a new project video.


Disclosure: Some of the links below are affiliate links, meaning, that at no cost to you, I get a small commission if you click through and make a purchase.

Monday, December 14, 2020

Wood carving Saint Onuphrius on beech wood


Tools and materials I propose:

PFEIL Carving Set

Flexcut starter carving set

Foredom Woodcarving Kit

Plunge router

Router bits


In this video I carve Saint Onuphrius on a solid piece of beech. I did it mostly using hand tools but I used a few power tools as well. 


I begun by removing as much material as I could using my router with a straight bit. I completed the job in three passes although four passes would be better because I had a few burn marks. 


I then  transferred the design on the wood.


I used the V chisel to cut outside the lines. This acts as a relief cut. Then I tried to match the curves with the curves of the tools. 


To remove much material I use the deep curved gouges and then I cleaned up with more flat tools. 


Once I was near the end. I sanded with 100grit. I then did some fine tunings with the gouges and the rotary tool.


I did my final sanding and finished the piece with mineral oil.


I didn’t go crazy with sanding and I also left quite a few tools marks on the piece. Saint Onuphrius was extremely ascetic. So I didn’t want to do it perfectly.


Anyway, this project was a challenge for me. I hope you’ll enjoy the video. But that was it. See you soon with a new project video!


Disclosure: Some of the links below are affiliate links, meaning, that at no cost to you, I get a small commission if you click through and make a purchase.

Monday, December 7, 2020

Wood carving a Saint on basswood - Agios Porphyrios


Tools and materials I propose:

Flexcut starter carving set

PFEIL Carving Set

BeaverCraft big bent  carving gouge


I begun by cutting two grooves on the back of the image. Then I glued two supports in place. Hopefully this would prevent the wood from warping over time.


I carved the image in three levels regarding their depth. The deepest level was the background with the aura. Then comes the body of the saint and finally the hands and the face. 


I used transfer paper to trace my design on the wood. Then I used the V chisel to cut away from the line. With a gouge I removed much material. 


To cut on the line I used gouges that matched the lines to do my stop cuts. Then I removed the material following the grain. 


I then sanded the piece and started painting. I wanted the lights to be on the back. Then I lightly sanded the high spots to reveal the light color underneath. 


I painted the typography and I finished the piece with clear water based varnish.


And my image was ready. I hope you liked it because that was it. See you soon with a new project video. 


Disclosure: Some of the links below are affiliate links, meaning, that at no cost to you, I get a small commission if you click through and make a purchase.

Tuesday, December 1, 2020

Making a different Christmas tree out of scrap wood - woodturning and woodcarving


Tools and materials I propose:

Longneck Angle Grinder

Flat file

Round file

Lathe

Wood turning tools set

Chuck kit

Rotary tool

Carving bits

Speed square

Circular saw

Flexcut starter carving set

Buffing kit

Forstner bit set


In this video I make a scrap wood xmas tree out of a piece of spruce I found in the garbage. It was an interesting woodturning project because I had to do some really tricky power carving to create the spirals. Enjoy the video and merry Christmas to all of you!


I begun by planing flat one side of the wood. I then used my circular saw to cut the piece in half. I glued the two pieces together. 


Then I used an axe and a hand plane  to make the piece as round as possible because my small lathe could not handle such big out of balance piece of wood. 


I then turned the piece true and created the tenon to fit my chuck.


I started hollowing the piece with forstner bits and my hook tool. This was endgrain hollowing so the hook works really nicely.


I then rouch turned the outer cone. On the bottom I epoxied a piece of wood so I could reverse the piece on the lathe using a face plate. 


I turned the piece true again and used my home made divider to design my spirals. 


I used my mini grinder to remove as much material as possible. 


I then used several carving bits on my rotary tool and even wood carving chisels to do the job. 


I sanded the piece as good as I could and then I parted it off the lathe. 


I sanded the bottom on a sanding block.


I cut a star on the bandsaw and I shaped it with my rotary tool.


Before I finish the piece I applied a coat of sanding sealer. This raised the grain a little bit so I lightly sanded with 320 grit. 


I finished the piece with a coat of clear and then I buffed it on the lathe. 


I really enjoyed this project, but that was it. See you soon with a new project video. Merry Christmas to you all!


Disclosure: Some of the links below are affiliate links, meaning, that at no cost to you, I get a small commission if you click through and make a purchase.

Tuesday, November 24, 2020

Olive wood cone with spirals - Woodturning and carving


Tools and materials I propose:

Longneck Angle Grinder

Flat file

Lathe

Wood turning tools set

Chuck kit

Rotary tool

Carving bits

Cordless Chainsaw

Vacuum chamber kit


In this video I make a wood sculpture out of olive wood. It is a cone with three carved spirals. I also used epoxy resin to fill the cracks and give my piece a bit more character. 


I begun by shaping an olive wood log to fit my lathe. I used my small cordless chainsaw and an axe for this job. 


I then turned the piece true and created a tenon to fit my chuck. 


I turned the piece to a cone shape. 


I then made a mold out of a plastic cup and vinyl film. I mixed some epoxy with black dye and poured it into the mold. I then degassed the resin in the vacuum chamber. 


I then rechucked the piece and turned it true again. 


I had some gaps on the resin so I refilled them.


I used a homemade divider to divide my cone into 6 parts. I then drew my spiral forms.


I used my small angle grinder to remove as much material as possible.


Then I used my rotary tool and a ball shaped bit to hollow my spirals. I worked little by little on each spiral and at some point I was done. 


I sued the rotary tool and files to do the final shaping. I sanded until 320grit. 


I reversed the piece on the lathe and used a spindle gouge to clean the bottom.


I finished the piece with mineral oil.


It was a really interesting project for me and I learned a lot of stuff.


But that was it, see you soon with a new project video.


Disclosure: Some of the links below are affiliate links, meaning, that at no cost to you, I get a small commission if you click through and make a purchase.