Sunday, March 28, 2021

Making a bownjo - experimental DIY bowed instrument using a drum as a body


Tools and materials I propose:

Mini drum

Drill press

Cordless drill

Bandsaw

Forstner bit set

Chisel set

Block plane

Flat file

Flexcut starter carving set

Wood burner

Round file

Spoke shave

Cabinet scrapers set

Rotary tool

Mask Respirator


In this video I make a bowed instrument that uses a small drum as a body and has a basswood neck. You can find similar instruments in several cultures of the world. My inspiration came from instruments like banjo, yaylı tambur, erhu and Iranian kamancheh.


I begun by working on the small drum. Basically I cut off it’s tail using my rotary tool so I can move it around while playing. I then removed the burrs. 


Then I drilled the holes I needed to connect the neck.


While the neck was still a square piece I drilled the hole that would receive a threaded rod. 


I then cut the neck on the bandsaw. I removed most of the material for the tuning pegs using a forstner bit. I finished shaping using a chisel and files. 


Because the instrument is played with a bow I rounded over the fretboard using a block plane. 


I shaped the neck using files and a spokeshave. 


I used 5 minute epoxy to glue the threaded rod on the neck. 


I made a string holder using a piece of sheet metal. I used a file and my angle grinder. 


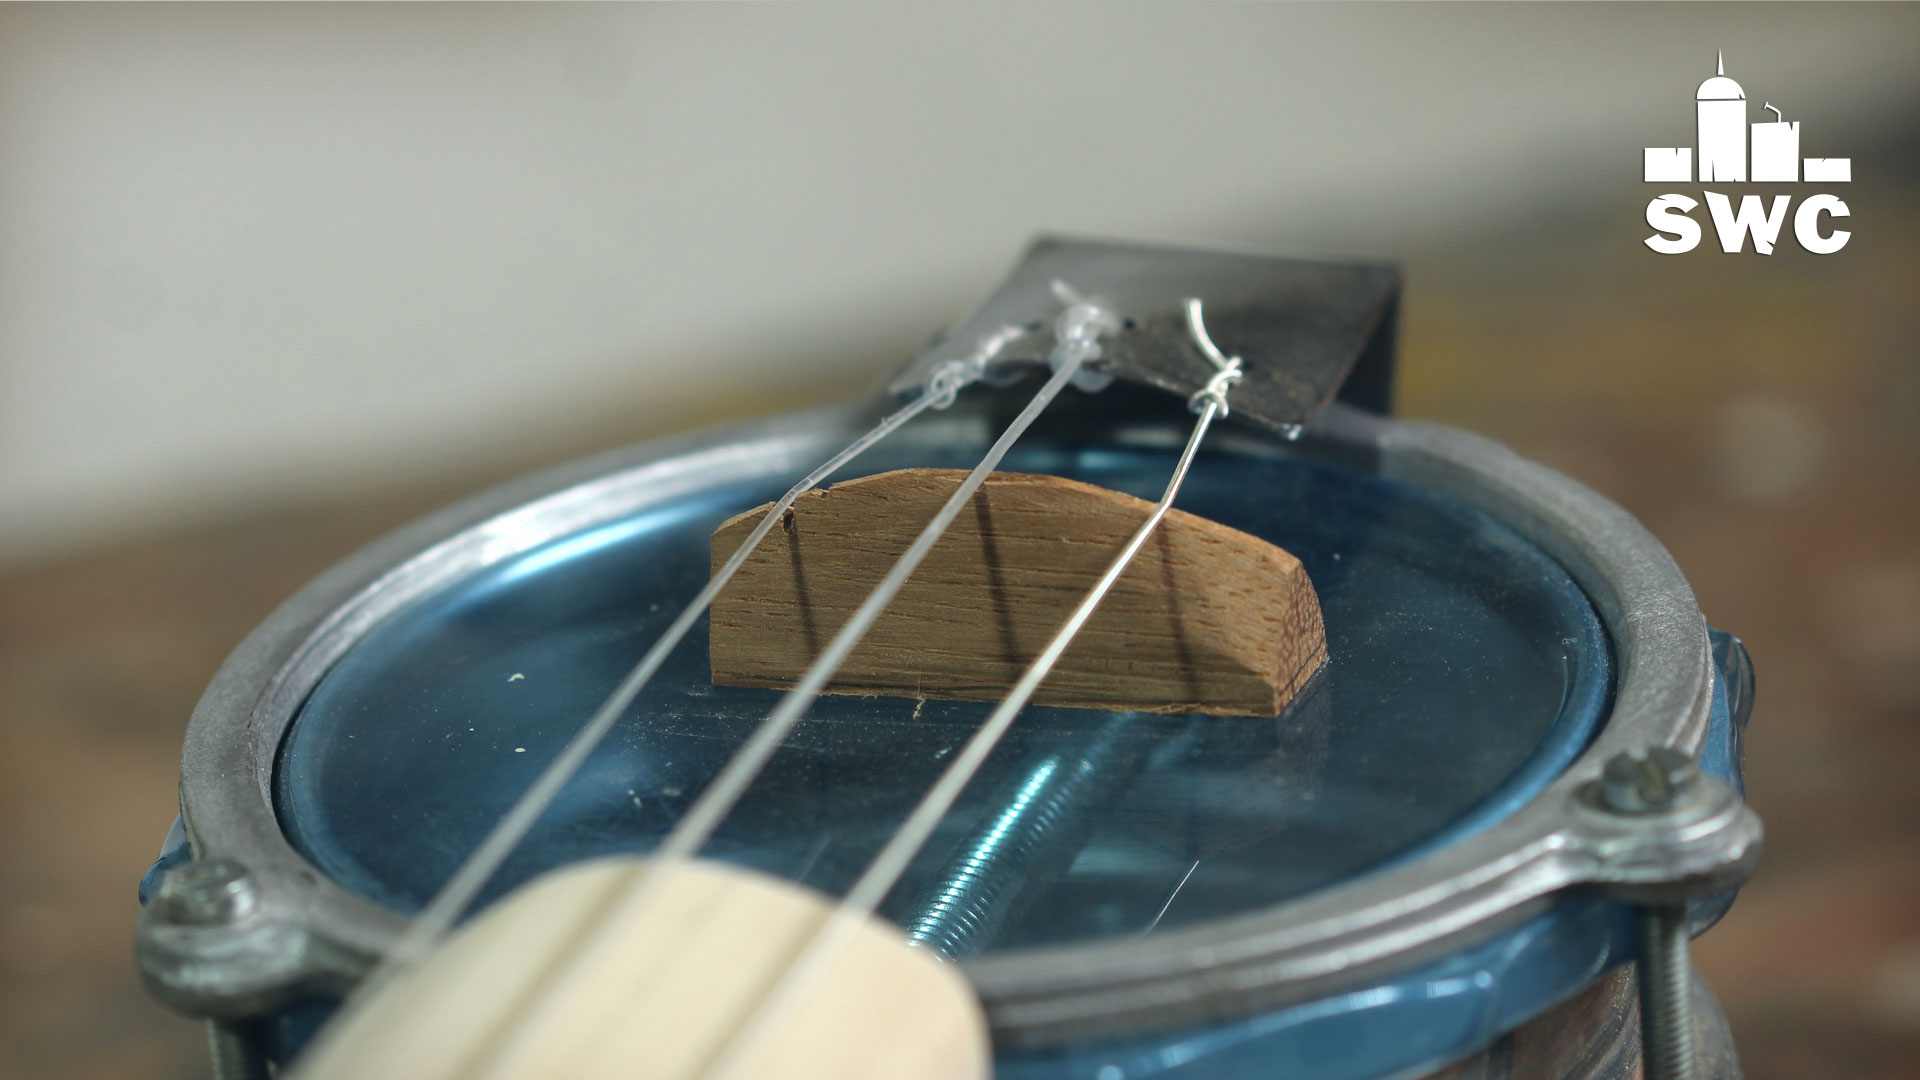
I made the bridge out of a piece of mahogany. To make the neck I used a piece of plexiglass. 


The distance from nut to bridge is 42cm. So I used an online fret calculator to find the fret positions. Although I didn’t add frets on the instrument, I used my pyrographer to add the fret lines so I know where to put my fingers when I play. 


I added rosin on the strings and on the bow and my instrument was ready to play.


I am not much of bowed instrument player but I think you get an idea of how it sounds. It’s actually pretty loud. I used nylon classical guitar strings and I tuned it like so: 1st 5th 1st.


I hope you like my bownjo, because that was it. See you soon with a new project video. 


Disclosure: Some of the links below are affiliate links, meaning, that at no cost to you, I get a small commission if you click through and make a purchase.

Sunday, March 21, 2021

Making a decorative wooden button out of mulberry and epoxy resin


Tools and materials I propose:

Lathe

Wood turning tools set

Chuck kit

Vacuum chamber kit

Buffing kit

Axe

Bandsaw

Forstner bit set

Cordless drill

Micro mesh sanding pads


In this video I make decorative wooden button out of epoxy resin and mulberry wood. It's diameter is about 12cm.


I begun by splitting a piece of mulberry into stripes using an axe. 


I then chose the pieces I wanted and cut them on the bandsaw.


I used a cylindrical plastic bowl from cheese, as a mould. 


To keep the pieces from floating in the resin I hot glued a piece of wood perpendicular to the pieces. 


I then filled the mould in resin and de-gassed it in the vacuum chamber. 


I then epoxied the blank on a glue block. 


I turned the piece to my likeness. To make the button holes I used the divider of my chuck to mark their positions. Then I used a quick and dirty jig to drill the holes with a forstner bit.


I then sanded the piece with mineral oil. I polished it with my micro mesh sanding pads and my buffing wheel. 


To polish the back of the button I used my bowl bottom jaws on the chuck. 


To make my button more real I added a black nylon cord.


I hope you liked my little button because that was it. See you soon with a new project video.


Disclosure: Some of the links below are affiliate links, meaning, that at no cost to you, I get a small commission if you click through and make a purchase.

Sunday, March 14, 2021

Woodturning the "fire drop" out of briar root


Tools and materials I propose:

Lathe

Wood turning tools set

Chuck kit

Vacuum chamber kit

Buffing kit

Foredom Woodcarving Kit

Flat file

Flat rasp


I made this out of a piece of briar root. I filled the cracks with black epoxy resin and then  I turned it on the lathe. I made the base out of beech. I really want to thank my friend and awesome craftsman and turner Fotis Kalovedouris for sending this amazing piece to me. 


You can check Fotis's work here.


I begun by filling the cracks with black epoxy. I did two pours to complete the procedure. I used the vacuum chamber to de-gass the resin.


I hen started turning the piece true. 


At some point my tools were not cutting. I saw that I had a rock in the root. So I cut that piece off.


I used my sphere making jig to shape the bottom of my drop. 


I then removed the piece from the chuck and found the centre. I used a flat rasp bit on my rotary tool, to blend the spherical bottom with the centre and create a drop like shape. 


I finished the job using a rasp and a file. 


I sanded the piece from 100 to 320. Then I started wet sanding with mineral oil until 1000grit. Finally I buffed the piece on my buffing wheel system.


I then made the base out of beech. I used a spindle gouge to hollow the top end grain.


I then divided the piece on the lathe. I used my rotary tool to shape it. I then paint it black with a water based dye. I filled it’s texture with embellishing wax. 


And my piece was ready. I hope you liked it, because that was it. See you soon with a new project video. 


Disclosure: Some of the links below are affiliate links, meaning, that at no cost to you, I get a small commission if you click through and make a purchase.

Sunday, March 7, 2021

Incense stick holder out of briar root - Woodturning


Tools and materials I propose:

Lathe

Wood turning tools set

Chuck kit

Vacuum chamber kit

Buffing kit

Caliper set

Forstner bit set

Jeweler's saw

Foredom Woodcarving Kit

Flat file

Round file


I made this holder out of a piece of briar root. I filled the cracks with black epoxy resin and then  I turned it on the lathe. I really want to thank my friend and awesome craftsman and turner Fotis Kalovedouris for sending this amazing piece to me. 


I begun by making a mould for my stock.


I then filled it with black epoxy and used the vacuum chamber to de-gass it. 


I used a carbide round scraper to turn the piece until I revealed the wood. I still had some gaps so I used some faster setting epoxy to correct them.


It was not perfect but much better. 


I then started turning the piece. Once I was ready with the exterior I begun hollowing.


I started with forstner bits and then used bowl gouges, the hook tool and a spindle gouge depending on the grain.


I then used my divider to divide the piece on into sections. Using my rotary tool and a jeweller’s saw I shaped the top lip.


I also made the hole for the incense stick. 


Next I used my rotary tool again to shape the bottom. 


I sanded the piece and then I buffed it on my buffing wheels. 


I think it came out really nice, but that was it. See you soon with a new project video. 


Disclosure: Some of the links below are affiliate links, meaning, that at no cost to you, I get a small commission if you click through and make a purchase.